BitLocker Partition Recovery

Image

Updated on November 23rd, 2020

This post is meant to discuss BitLocker partition recovery, or specifically how to recover deleted or lost BitLocker encrypted drives in Windows 10/8/7/Vista/XP. Free download the BitLocker data recovery software DiskGenius and start to recover BitLocker drive now.

Why do we need BitLocker encrypted partitions?

How to protect data from loss, theft, or hackers? The answer will be BitLocker.  BitLocker Drive Encryption is a full disk encryption feature included with the Ultimate and Enterprise editions of Microsoft’s Windows Vista and Windows 7, and with the Pro and Enterprise editions of Windows 8 desktop operating systems, as well as the server platforms, Windows Server 2008, Windows Server 2008 R2 and Windows Server 2012. BitLocker is able to encrypt the hard drive where the operating system is installed as well as internal hard drive. Besides, it can protect files saved on removable devices like external hard drive and USB flash drive.

BitLocker encrypted partition loss issues

BitLocker encrypted drive provides a safe and efficient way to prevent unauthorized access of your data, and it cannot avoid data loss issues, for example partition loss. There are many causes accounting for the issue, for example accidental deletion, disk repartitioning, bad sectors, partition table corruption, system crash, etc.

What to do when BitLocker partition gets lost? The first and foremost move is to stop all possible writing actions to the disk, otherwise recoverable files will turn to corrupted. Then start lost partition recovery with professional data recovery software such as DiskGenius.

BitLocker partition recovery software free download

DiskGenius is professional data recovery software and it supports to recover lost/deleted files from BitLocker drives, hard drive, external HDD, USB flash drive, SD card, thumb drive, virtual disk, RAID, etc. Moreover, it supports lost partition recovery, RAW drive recovery, formatted recovery, photo recovery, document recovery and so on. With this tool, you can recover recover lost BitLocker encrypted partition and files in the partition, which gets lost due to deleting, formatting, virus attack or other unknown reasons.

In addition to data recovery, DiskGenius is also an effective and free tool for BitLocker management. BitLocker partition is marked as “BitLocker Encrypted” in the software, and you can unlock Bitlocker drive via password, recovery key or BEK file no matter whether the Windows OS on your computer supports BitLocker function.

Lost BitLocker partition recovery guide: how to recover deleted / lost BitLocker partitions?

Before recovery

  • Try to keep the disk away from any writing actions so as to protect lost partition from being damaged.
  • You should know the password, recovery key or BEK file for the lost BitLocker partitions.

Below is the step-by-step partition recovery guide:

Step 1: Install and launch DiskGenius from a Windows computer.

It does not matter whether the Windows version supports BitLocker feature.

Step 2: Select the disk where you want to restore lost partitions and click Tools > Search Lost Partitions (Partition Recovery).

BitLocker data recovery

Step 3: Click Start button from the pop-up window and DiskGenius starts to scan the disk.

BitLocker Data Recovery

Step 4: Reserve correct partitions and Ignore wrong partitions.

You can judge whether to Reserve or Ignore the partition by preview files in partition.

BitLocker data recovery

Once the software finds out a lost BitLocker drive, you will be prompted to unlock it so that you can view files in the partition and check if you need to restore it.

BitLocker data recovery

Click OK when scanning process completes.

BitLocker data recovery

Step 5: Save partition table: Disk > Save Partition Table.

After lost partitions are saved to current partition table, you can access them in Windows File Explorer.

BitLocker data recovery

If you do not want to make changes to current partition table, you can just copy needed files to another disk instead of saving partition table.

BitLocker data recovery

Conclusion

To sum up, lost BitLocker partition recovery is easy to perform if you use professional data recovery software. Apart from recovering lost BitLocker drives, DiskGenius also supports to recover deleted or lost files from BitLocker encrypted partition. For more information, please refer to the article: BitLocker data recovery: how to recover data from bitlocker encrypted drive?

D:\ is not accessible. The parameter is incorrect

Image

Updated on May 13th, 2021

 Drive not accessible. The parameter is incorrect

It frequently occurred that partition on hard drive or external hard drive can’t be opened and reports the error like “D:\ is not accessible. The parameter is incorrect.”

The parameter is incorrect

Various reasons can lead to this problem:  

  • Power failure for powered hard drive;
  • Plug out hard drive in an improper way;
  • Virus attack;
  • File system goes wrong;
  • Bad sectors.

How to deal with this problem without losing files in the partition? If you Google this problem, you’ll find many answers that suggest performing chkdsk or formatting, however, after which files will get lost.

How to recover data when drive is not accessible?

Step 1: Connect the storage device which is not accessible and reports “The parameter is incorrect” to computer. Then it can be recognized by your system. If your computer fails to detect it then try another USB port or PC.

Step 2: Download, install and launch Eassos Recovery to PC. Select the first recovery mode and enter next interface. This feature is capable of restoring lost data from damaged, RAW or formatted partitions.

The parameter is incorrect

Step 3: Select the icon representing the inaccessible partition and click “Next” to continue.

Step 4: Eassos Recovery checks partition information and searches for lost files and file directory. It displays files while scanning process is working and keeps updating scanning results as more files are found out.

The parameter is incorrect

Users are allowed to preview files while scanning is working and they can pause or stop scanning if all desired files have been found and there is no need to make further scanning.

Step 5: Save files to a safe location such as any healthy partition that has enough disk space to hold these files and doesn’t need recovering data.

How To Allocate Free Space in Windows 10/8/7

Image

Updated on May 13th, 2021

This article talks about how to allocate free space in Windows 10/8/7/Vista/XP, so that you can make full use of disk space.

What is unallocated free space?

Unallocated space or free space is a certain period of logical space on a hard drive or USB disk that operating system such as Windows cannot write to. When you set up a storage device on computer, you need to partition unallocated space so that is can be recognized and used by system. If you leave disk unallocated, then you cannot use disk space to store data. It is common that a disk contains unallocated disk space which does not belong to any partition. It does not show up in File Explorer and no programs can write to the space. If you open Disk Management you can view the space is marked as “Unallocated”.

“I just upgrade my system drive for my laptop from an 80 SSD to a 320GB SSD. I cloned the SSD successfully, and now there is not problem with system booting. But the SSD contains large unallocated space. Now I need to extend the Window partition to include the unallocated space. However, the Extend option in Disk Management is not available. Do I have to create a new partition on that area?”

How to deal with unallocated free disk space?

To make use of unallocated disk space you need to either create a new partition on it or add it to an existing partition.

When you set up operating system, the installer often asks to partition the drive. Of course, you can partition the disk on your own. In this way, there’s usually not unallocated space. You can also create new partition even though you’ve installed operating system. Both Disk Management and free partition manager software can do the task for you. One thing you should note that if your hard drive is using MBR partition table and there are already 4 primary partitions (3 primary partition and 1 extended partition) on the disk, you may get problem during crating partition.

Most times we choose to create new partition on unallocated space if it is large enough for a partition. However, if the unallocated is too small, you can choose to add free space to one of existing partition. The process of allocating free space to partition does not cause data loss. Disk Management is able to extend partition by adding free space to partition, but it can only add it to adjacent partition.

Solution 1: Create new partition on unallocated free space

Method 1: create new partition on unallocated space in Disk Management

Step 1: Open Disk Management. Right-click on Start button and choose Disk Management.

Step 2: Locate the unallocated space in Dis Management. Right-click on it and select New Simple Volume, as below:

allocated free disk space

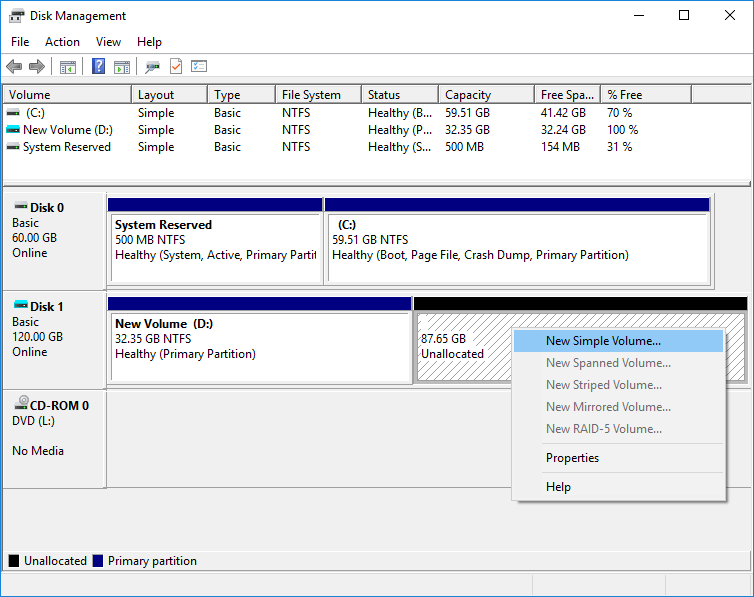
Step 3: Follow the “New Simple Volume Wizard” to complete the process. If you are not familiar with those settings in the wizard, you can just follow the default settings.

Method 2: Create new partition on free space in DiskGenius Free

DiskGenius is free disk partition software and it is able to manage disk and partition for hard drive, virtual disk, SSD, USB flash drive, SD card, etc.

Step 1: Install and launch DiskGenius from computer and you can easily find the unallocated disk space which is marked as Free.

Step 2: Select the free disk space and click New Partition button from toolbar. Then the “Create New Partition” window shows up, as below:

allocated unallocated space to partition

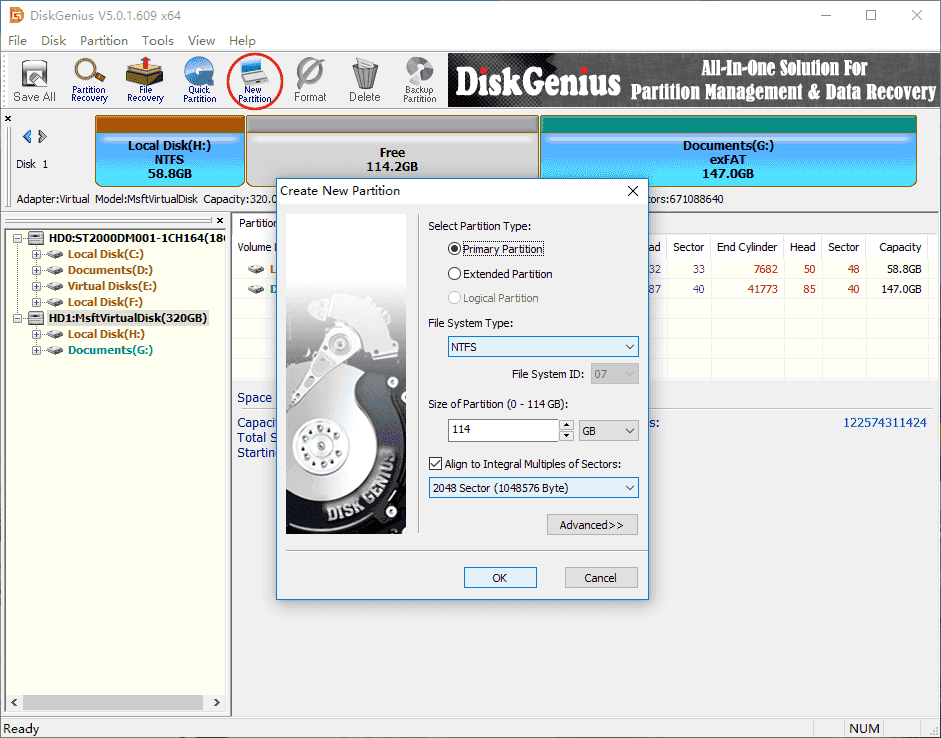
Step 3: Select partition type and file system type, and click OK button.

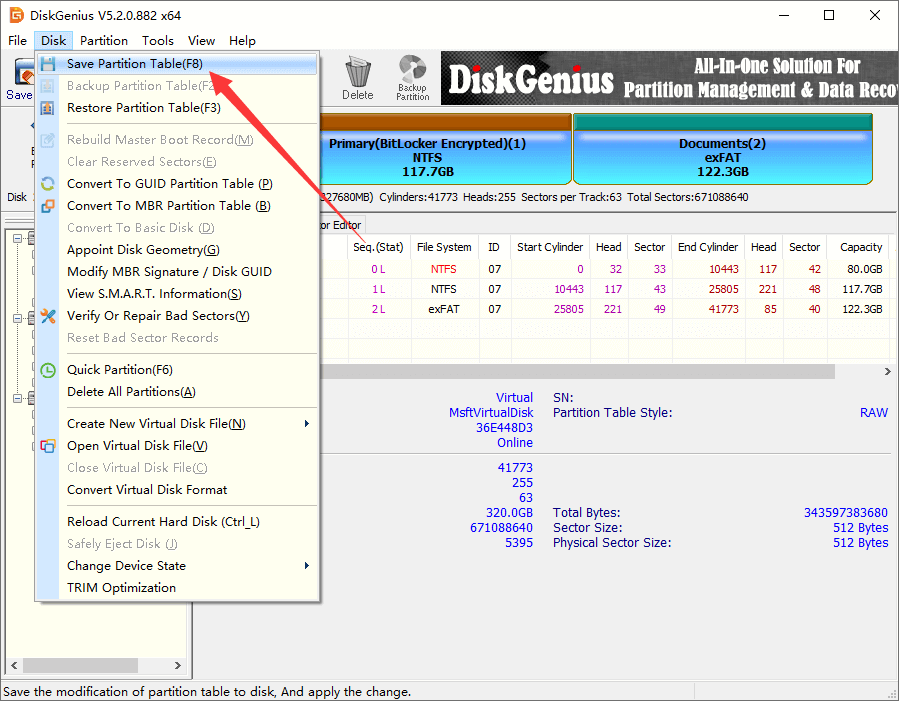
Step 4: Click Save All button from toolbar and DiskGenius will asks whether to format the partition. Click Yes and get the partition formatted.

Solution 2: Allocate free space to existing partition

What will you do if there is free space, say 15GB, on the disk which is not large enough to create a new partition? I think the best solution is allocating it to other partitions. This can be carried out by two methods.

Method 1: Add unallocated space to an existing partition without data loss

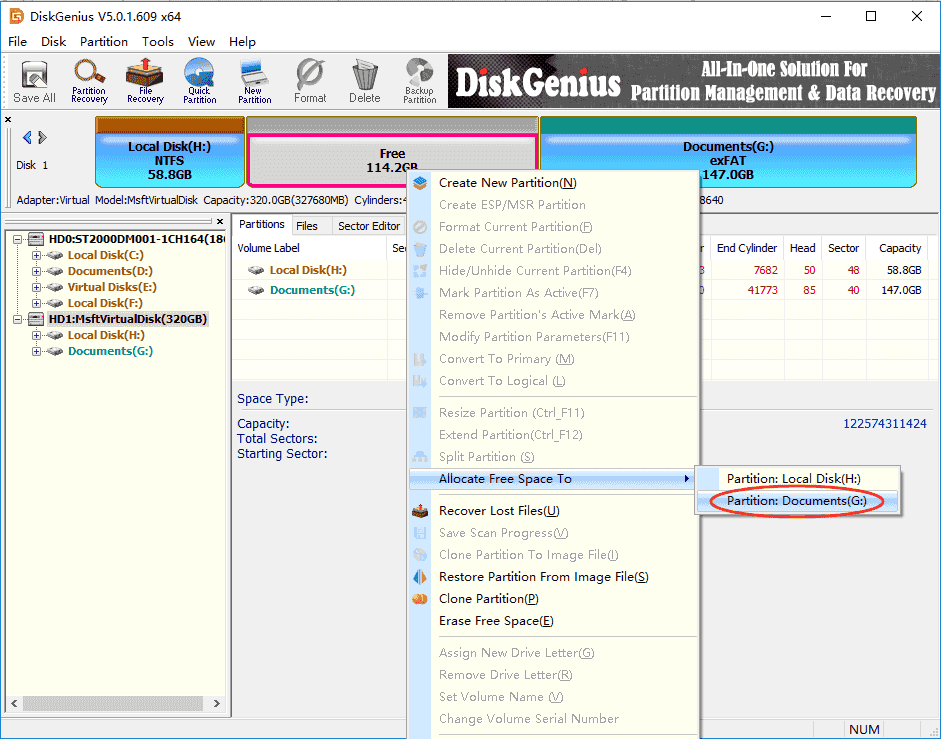
Step 1: Launch DiskGenius from your computer. Then you can clearly view partitions and the unallocated space on the disk.

Step 2: Right click free space and select the items “Allocate Free Space To” and choose a partition to add the space.

allocated unallocated space to existing partition

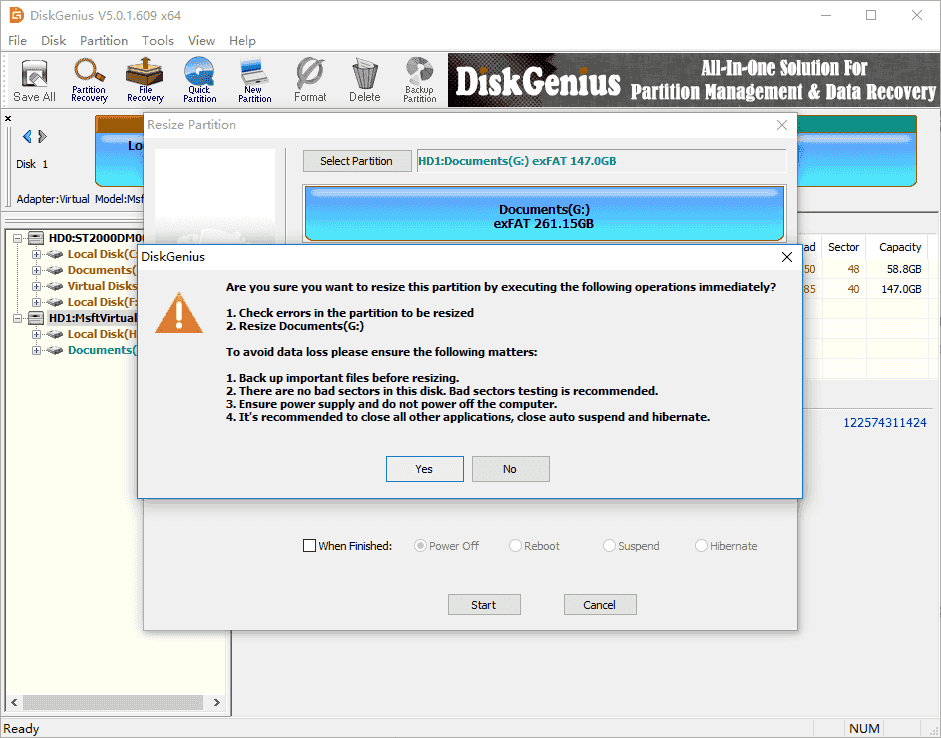
Step 3: DiskGenius shows operations to be done and things you should note. Click Yes and it starts to move disk space to specified partition. Then wait for the process to complete.

allocated unallocated space to existing partition

Method 2: Expand partition to add free space in Disk Management

Note: In Disk Management, you can only add free space to adjacent partition, for instance, partitions and free space is displayed in the order “(C:), (D:), Unallocated”, the unallocated space can only be added to D drive instead of C drive. If you want to add it to any other partition, you can follow method 1.

Step 1: Go to Disk Management. Right-click on the partition that next to the free space and choose “Extend Volume”

Step 2: Follow steps of Extend Volume Wizard to expand the partition.

Conclusion

In this tutorial, we’ve talked about a couple of solutions to deal with unallocated free disk space in Windows 10, Windows 8, and Windows 7. Follow this guide and you can make full use of disk space on hard drive or USB disks. If you have any question or need any help, please feel free to contact us.

How to convert MBR to GUID without data loss?

Gallery

This gallery contains 1 photo.

Updated on May 14th, 2021DiskGenius (old name Eassos PartitionGuru) Free provides comprehensive functions for partition management and it is able to convert MBR (master boot record) to GUID partition table (GPT) without losing data. Step 1: Get DiskGenius (old name … Continue reading

E:\ is not accessible. The file or directory is corrupted and unreadable

Gallery

This gallery contains 1 photo.

Updated on November 24th, 2020USB drives are quite popular these years and they really bring about convenience. They are portable, small size, large in capacity, etc. and satisfy various data storage demands. Sometimes, partitions or other storage devices such as … Continue reading