The article posted here is going to talk about unallocated disk space, explaining how to add unallocated apace to partition or system drive. Besides, it gives other solutions to deal with unallocated disk, for example, create new partition on unallocated disk as well as recover data from unallocated area. In the closing part, you can learn how to recover missing or unallocated space on USB drive. The table of content lists major topics and you can click link to read corresponding content.
What does unallocated disk space mean?
What is unallocated space? Operating system regards any hard drive space that does not belong to a partition as unallocated. Unallocated space also means free space where no data or applications can be written. Unallocated disk area does not show up in Windows Explorer and it can't be used by system before it is allocated. When setting up new computer, Windows installation setup will prompt to partition hard drive to make use of unallocated space. Sometimes, a partition may become unallocated due to damage. Disk Management and some partition manager provide solutions to allocate free disk space.
A single hard drive usually contains more than one partition, as users store operating system and personal data in separated sections. For instance, many computers have a system partition with drive letter C, and there might be D drive or E drive. Each partition stands for a segment of allocated space on a physical hard drive. Space on a brand new hard drive is in a blank state, which stores no data or directory structure that manages disk space. Once you partition the hard drive and assign drive letter to each partition, Windows can recognize them and write data to partitions. As to unallocated space, you can add it to C drive or other partitions as well as create a new partition on it.
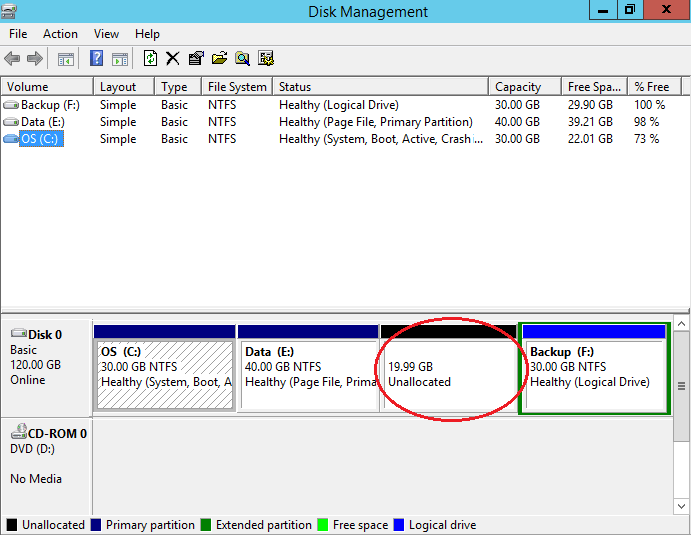
Here, we picked out a typical case from forum:
"My knowledge about computer is very very basic. My computer is running Windows 10 and all stuff are on drive C (I know I should leave system drive alone). Long story short, the hard drive on my computer contains a 50GB area called Unallocated displaying in Disk Management. I don't know when that space appeared. If at all possible, I want to merge that Unallocated space to drive D. I right click Drive E, but the "Extend Volume" is greyed out. Does that mean it is not possible to move unallocated space to D drive? Thank you for any help in advance!"
How to add unallocated space to existing partition?
Method 1: Extend adjacent drive in Disk Management
Step 1 Open Disk Management. Use Windows + R to open Run and type diskmamt.msc in Run box and click OK button.
Step 2 Select partition adjacent to unallocated space and select "Extend Volome".
Step 3 The "Extend Volume Wizard" pops up and click "Next" button here.
Step 4 In this step you can select disks. You can use space on one or more disks to extend the volume. Also you can set volume size, but you can only extend the volume to the available space shown in the dialog box. Because the disk cannot be converted to dynamic or the volume being extended is a boot or system volume. If you are confused by this step, you can just click "Next" button and follow all defaulted settings.
Step 5 Click Finish button to finish the process. Now the unallocated space is gone and it has been added to adjacent partition.
Disk Management is not able to merge unallocated space to any partition. Many times, when you simply right click partition and select "Extend Volume", the "Extend Partition" option is greyed out, as follows:

This is one of the limitations on Disk Management console. You can only add unallocated space to the adjacent partition which lies on the left hand. If you want to move unallocated space to other partition, you need to use third party applications, see Method 2.
Method 2: Merge unallocated space to any partition
We recommend DiskGenius Free to allocate free space to existing partitions. Generally, this free partition manager works the same as Windows Disk Management. It includes all features Disk Management can offer and provides more flexible functions to complete complex operations. You can use it to move free disk space to any partition including system drive without data loss. Download and install DiskGenius and you can follow steps here to make use of unallocated disk space.

Step 1 Launch DiskGenius and you can see the free disk space in the main interface. Right-click free space and select "Allocate Free Space To". Then you can select which partition you want to merge. In the screenshot below, there are three partitions on the disk, and you can choose any of them to merge the free disk space.
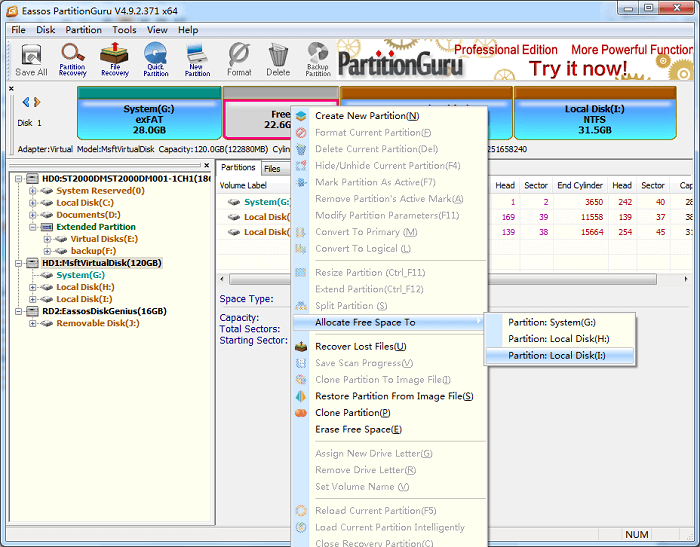
Step 2 Click "Yes" and DiskGenius starts to move disk space to specified partition.
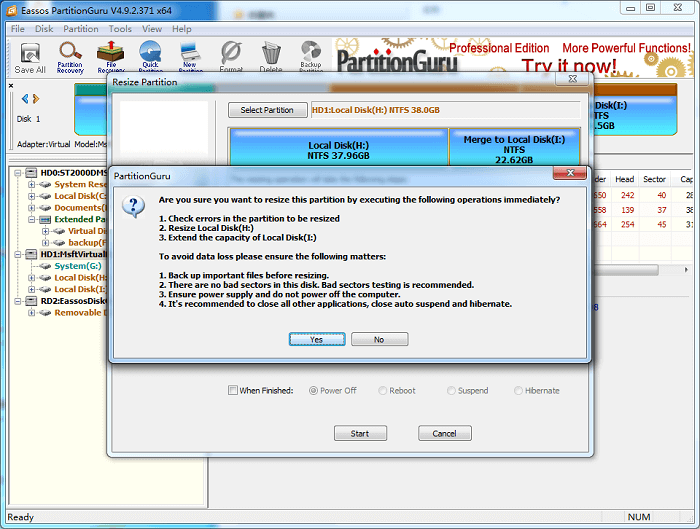
This process does not affect current files in involved partitions though, to ensure successful disk space removal you should make sure there are no bad sectors on hard drive and ensure power supply is normal during the process. Besides, do not close the software while it is transferring unallocated space.
Step 3 Click Complete button when the process is done.
Create partition on unallocated disk space
Method 1: Create partition in Disk Management
Step 1 Right-click Unallocated or free space and select "New Simple Volume". And the New Simple Volume Wizard comes up.
Step 2 Click Next button on the Welcome interface. Then you can choose a volume size that is between maximum and minimum size and click Next button.
Step 3 on the following two pages, you can set drive letter, file system type, volume name, allocation unit size, etc. Click Next buttons. Finally, click Finish button to complete the process.
Notes:
Allocation unit size: This is the basic unit where disk space is allocated, and the default value is based on the volume size. You can set it to a specific value if necessary.
Volume Label: volume label is the name of the newly created partition and it is set to New Volume by default. You can change volume name at any time.
Enable file and folder compression: The built-in compress is available only for NTFS. If you select this option, files and directories will be compressed automatically.
Method 2: Create new partition on unallocated space using free partition manager
Another way to create new partition on unallocated area in Windows 10/8/7/Vista/XP is using partition manager. DiskGenius can help you create primary, extended or logical partition and format partition to NTFS, EXT4, exFAT or FAT32. If Disk Management on your computer cannot perform the task or reports errors such as "The operation failed to complete because the Disk Management console view is not up-to-date", you can follow the step-by-step guide to utilize free space.
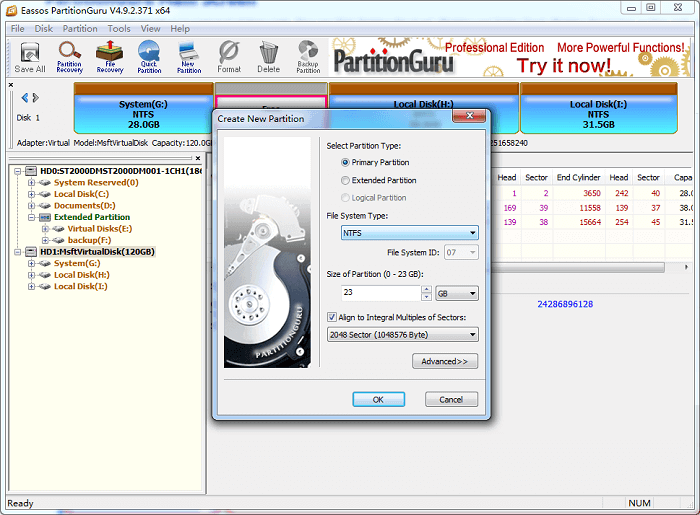
Step 1 Launch DiskGenius and select the unallocated space which tagged as Free from the Disk Partition Structure area. Then click "New Partition" from toolbar.
Step 2 Click OK button. On the Create New Partition dialog box you can select partition type, file system type, partition size, 4K sector alignment, etc. Also, you can click Advanced button to make advanced settings such as starting and ending sector for the partition.
File System Type: You can set file system type as NTFS, EXT4, exFAT, FAT32, etc. NTFS is selected by default in many cases when you create partition on hard disk drive. If you create partition on USB flash drive or SD card, FAT32 or exFAT is recommended.
Align to Integral Multiples of Sectors: This option is provided to make partition 4K alignment. 4K alignment is important to SSD. If it is not correctly aligned, it can slow down in performance.
Step 3 Click Save All button and click Yes on the popped-up dialog box to make the change take effect.
Step 4 DiskGenius will ask you "Do you want to format the following new partition immediately" in a dialog box. Click Yes and it will perform a quick format and assign drive letter for the new partition.
Recover missing or unallocated space on USB drive
USB flash drives are portable storage devices which greatly facilitates data transfer between computers. USB flash drive brings about convenience, but it is not problem-free. One issue is unallocated memory. Let's take a close look at the unallocated space problem now. An 8GB USB flash drive may show 49MB in File Explorer after making it as a bootable drive. When you open Windows Disk Management Console you can see the USB drive contains 7+ GB unallocated space. If you right click the allocated area you cannot select the delete volume option which is greyed out, also the unallocated area does not have option to change it to normal partition or add space to other partition. On this occasion, Disk Management can't recover or reuse unallocated space on USB drive. You can use the following two ways to add unallocated disk area to partition:
Method 1: Use Windows DiskPart command
This method is going to clear everything including current partition and files from the USB drive and then create a new partition. The new partition will contain the entire capacity of the USB flash drive. Please ensure you have made a backup for important files before carrying out following steps.
Step 1 Open diskpart command prompt window. Click Start button and enter Diskpart in the searching box. Right-click "diskpart.exe" from searching results and choose Run as administrator. Click YES button on the UAC prompt dialog box.
Step 2 Type command list disk and hit Enter. This command shows current disks attached to your computer and remember the disk number of the USB drive. In this case, the removable disk is Disk 1.
Step 3 Type following command and each with hitting Enter key.
select disk 1 (The command will select the USB disk)
clean (This command deletes all volumes on the selected disk)
create partition primary (This command is going to create a new primary partition)
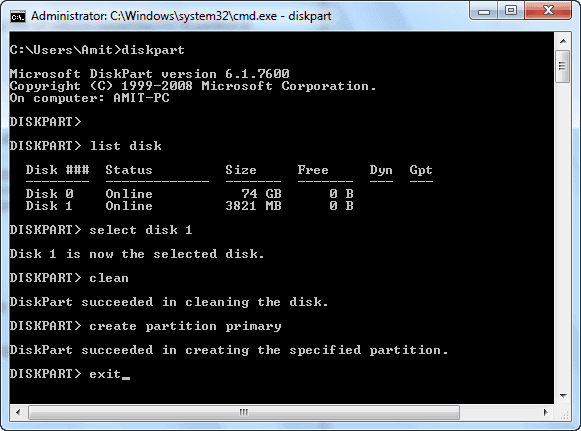
Step 4 Type exit and press Enter when you see DiskPart succeeded in creating the specified partition.
Step 5 Go back to Windows Explorer and format the USB disk. Then you can use the disk as usual with the full space.
Method 2: Use partition manager
Again, we can use DiskGenius to deal with the issue. You can either create new partition on unallocated space or add it to current partition. Since Windows does not allow users to access the second partition on USB flash drive, it is recommended to all this area to existing partition.
Step 1 Insert the USB drive to computer and launch Partition. Select the USB disk from the Partition and Folder tree on the left part and you can see partition condition on this disk on the right part.
Step 2 Right click current partition on the flash drive and select "Extend Partition".
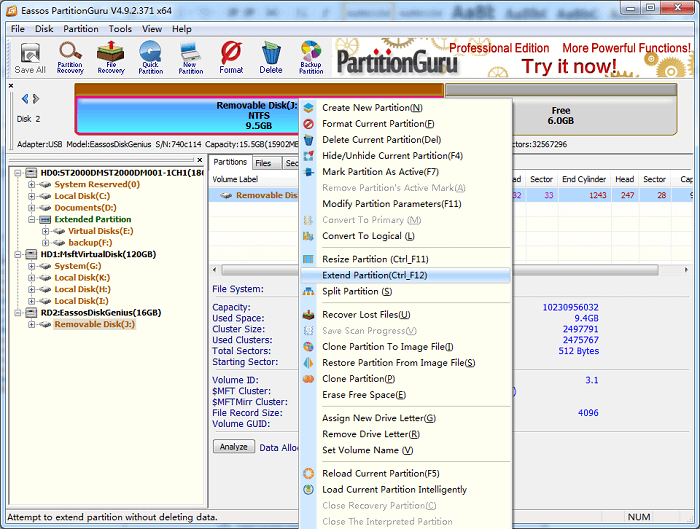
Step 3 The Resize Partition window will extend the partition by adding free disk space. Click Start button and Yes on popped-up dialog box.
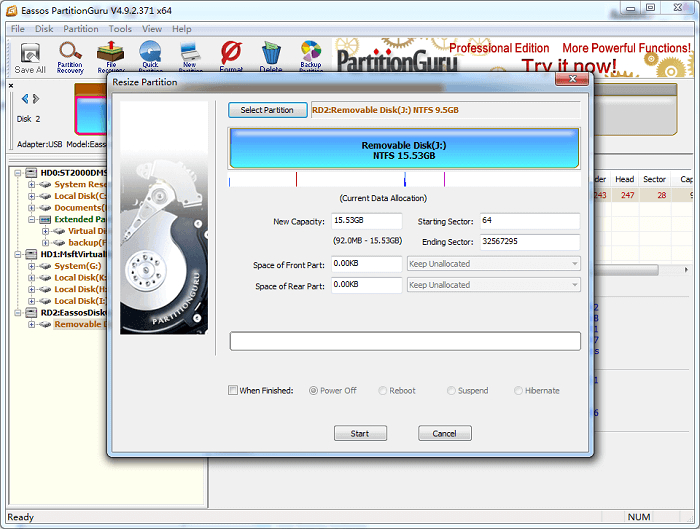
Step 4 When the process is done, click Complete button. Now the USB disk's capacity is back to the original capacity.
Conclusion
This article presents solutions fix unallocated space which can be added to any current partition or create new partition. All solutions here are easy to understand and use. I hope this article would be helpful for anyone with the same issue. If you have any questions, please feel free to comment or contact our technical support team.







 Facebook
 X
X Youtube
Comments
freedom
2026-01-04 10:00:56
"It works"
"I replaced a 120gig SSD drive with a 500gig SSD drive and the Acronis drive clone gave me my original drive clone with 353 gigs unallocated space. When I right click on this space all I get for a choice is: HELP! This does me no good. What must I do to get your software to see this space? I would like to expand my cloned c to include this space. Thanks "
LYNDON LEINING
2018-10-24 00:32:43