In this article you can find three step-by-step methods to partition a hard drive in Windows 10/8/7, such as partition a hard drive with Disk Management and partition manager software. Partitioning a hard drive is the process of dividing a disk into one or multiple sections and proper partition can aid performance. If you want to partition or repartition a hard drive, keep reading to find proper solutions.
About partitioning a hard drive in Windows
Disk partitioning is one of the common operations we should know about, as it relates hard drive performance and data safety. This section we will talk about basic information about hard disk partition and why you might need to partition a hard disk or USB drive.
Hard drive partition introduction
What is disk partitioning? In short, it is splitting a hard drive's logical storage into multiple drives with each takes up a portion of usable storage. The hard drive being partitioned is a single physical disk, but we can see divided areas appearing in Windows. The main reasons we partition a hard disk is to organize space and data.
There are two common ways to partition a single disk on Windows computer: single partition and multiple partitions. Some computers only contains one drive (C:) where installs operating system and applications, and stores user's data; other users would like to create two or more partitions, installing Windows and programs in drive (C:) and store personal data to additional partitions, such as D: and E:.
During disk partitioning, you will be asked to which partition scheme to choose. Currently, there are two classic partitioning schemes: MBR and GPT.
- MBR (Master Boot Record): MBR is the traditional approach of organizing partitions for hard disk and it is widely used now. MBR is located at the very beginning of storage device, recording information for partitions. Besides, MBR holds a bit of executable code which plays important parts in booting system. On MBR disk, there can be 4 primary partitions (or 3 primary partitions and 1 extended partition) at most. To create more partitions, you can set one of the primary partitions as extended partition where you can create multiple logical partitions. The shortage of MBR partition scheme is that it is able to manage up to 2TB capacity, thus it is not suitable for larger hard disks. Besides, MBR is the only place to store partition information. Once MBR is corrupted due to certain, partitions may get lost or the entire disk may become unreadable.
- GPT (GUID partition table): GPT is a newer partition standard, using GUID (Globally Unique Identifiers) to describe partition, which is going to replacing MBR gradually. GPT disk relates to UEFI which will replace the old BIOS, thus you can use GPT on a UEFI-based system. In theory, you can create unlimited numbers of partitions on a GPT hard disk, though many operating systems restrict it to 128 partitions. Each partition on GPT disk can contain up to 2^64 blocks in length, which is 9.44 ZB. The GUID partition table scheme stores partition table information in Primary PGT header at the beginning of the hard disk and a backup called secondary GPT header at the end of the disk. Thus, you can recover data from the backup information when the primary table gets corrupted. There is also a Protective MBR on the first sector of the GPT disk, so that a BIOS-based system can boot from a GPT disk via a boot loader stored in the protective MBR's code area. Besides, GPT disk performs CRC32 checksums to check corruptions and errors for partitions.
When do you need to partition a hard drive?
This part summarizes several reasons that you might need to partition a hard disk:
- There is one partition on the disk. Some laptops comes from factory with a single partition, which means there is only one drive (C:) under My Computer. If hard drive contains a single partition, you may want to add more partitions for different types of data. After the disk is repartitioned, operating system can be installed to a separated partition.
- Set up a new hard drive. It is necessary to partition a new hard drive to prepare it for storing data or installing operating system. New hard drive can be partitioned to MBR or GPT based on actual demand.
- Organize data in a better way. Many users feel that putting data in different partitions is a better way to organize data than storing everything on a single drive. Actually, disk partitioning is more a personal choice for data storage, and you can arrange data based on your own habits. Most users prefer putting photos, documents, movies and games on separated partitions instead of dividing data via folders in a single partition. In addition, you might set a partition to hold all your sensitive data and encrypt it for safety. It's convenient to encrypt one partition instead of the whole hard disk.
- Data backup and restore. It takes less time and effort to backup partitions one by one than backing up an entire hard disk. For example, you install Windows and application on drive C: and put data on other volumes. To create a backup for system, you can just back up drive C: to an image file without considering other partitions.
- Multi-boot. If you want to install multiple operating systems, you should create a dedicated partition for each operating system. Also, it's common to create additional data partitions for system drive. Dual-booting is popular among computers experts and geeks who often install different systems like Windows and Linux.
- Protect computer against software failure. Though partitioning a hard drive does not protect against hardware failure, you'll be less likely to lose data when encountering software failure. Say you install OS on a separate partition and you may have to reformat, reinstall or restore Windows when system does not work well. In that case, you don't have to worry about losing other partitions.
What to do before partitioning a hard drive
Benefits of partition hard disk have been discussed in previous part. If you understand these advantages and decide to partition your hard drive, you might be wondering how to do it and what should be noted before disk partitioning. Here we list several tips prior to the partitioning process.
- Back up your data before partitioning your hard disk. As we all know, most often, disk repartition formats the entire hard drive, causing data loss of the disk. Thus, you should always back up everything you cannot afford losing to another disk. Though many partition manager programs are able to resize, split or extend partition without losing data, data backup is still needed. That's because bad sector, power failure, partition errors, etc. can result in data loss. If you do not have backup software, you can back up data by copying data to a different disk.
- Create a bootable rescue CD or USB drive. If you are going to partition the hard drive where operating system is installed, you cannot perform the operation while system is running. Thus you have to boot computer to DOS, Windows RE or Windows PE using bootable CD or USB drive, after which you can run partition software and create partitions.
- Download the latest applications and drivers. If you plan to reinstall operating system after the disk is partitioned, you may have to prepare a core set of applications that you will use. You can click Start menu and select All Programs to check installed software, such as the latest version of anti-virus software, web browser, outlook exchanges, drivers, etc.
- Prepare a free partition manager program. Partition manager software is much more effective and flexible than Windows Disk Management, and it is a good assistant to partition any storage devices. There are many partition manager applications on the Internet, and you can choose one which is powerful and free of charge. Remember to read the user manual before using it.
How to partition a hard drive in Windows10/8/7?
Method 1: Partition a hard drive in Windows 10 Disk Management
Step 1 Open Disk Management. Click Start menu and type diskmgmt.msc in the searching box, and click the searching result to open Disk Management. In Windows 10, you also can right-click Start button to find Disk Management. If you get the UAC dialog box, then give confirmation.
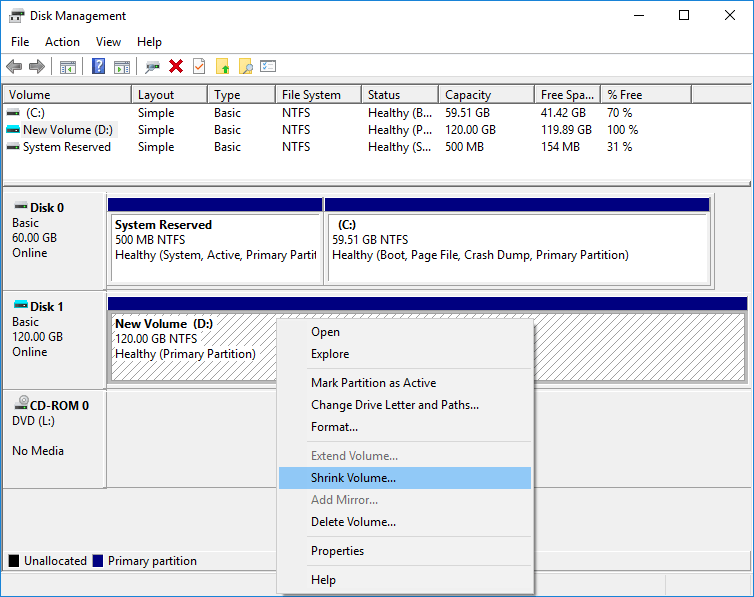
Step 2 Right-click the hard drive you want to partition and choose Shrink Volume.
As you can see in the picture below, the example hard drive is 120GB and it holds a single partition. In this example, we'll split the current partition into 2 partitions without losing data. If you want to repartition the disk, you can delete the volume and create a new partition.
Step 3 Enter the amount of space to shrink and click "Shrink" button.
As in the picture, the value of "Total size before shrink in MB" is the total size of the partition and the value of "Size of available shrink space in MB" means the maximum size you can shrink. Enter a value that does not exceed the available shrink size.
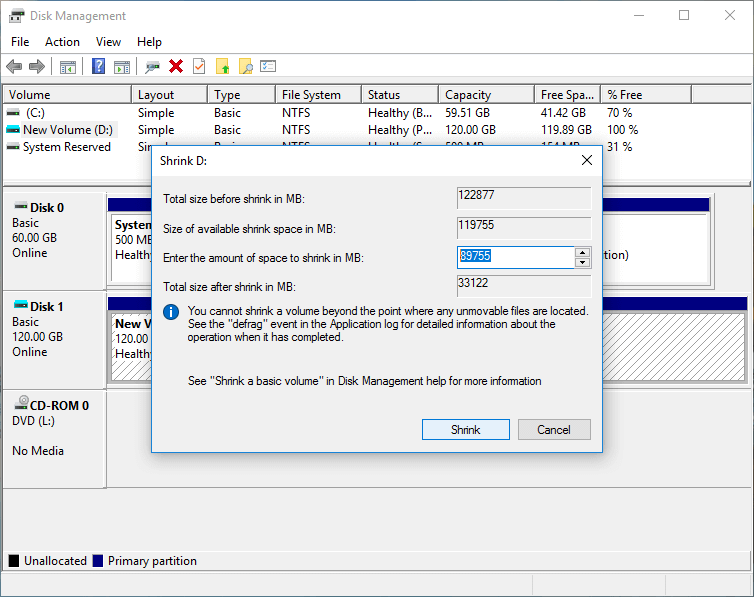
Note: In some cases, the Value in "Size of Available Shrink Space" can be smaller than the free space which is shown in Windows Explorer. For example, there is 60GB free space on the volume, but the available shrink size is only 30GB calculated by Disk Management console. The reason of the issue is that the available space is restricted by what and how files are allocated on the disk. For example, some files such as page and shadow copy files are regarded as unmovable data by Disk Management. If these unmovable files are stored on the middle of the free space, only free space of either side is available to shrink.
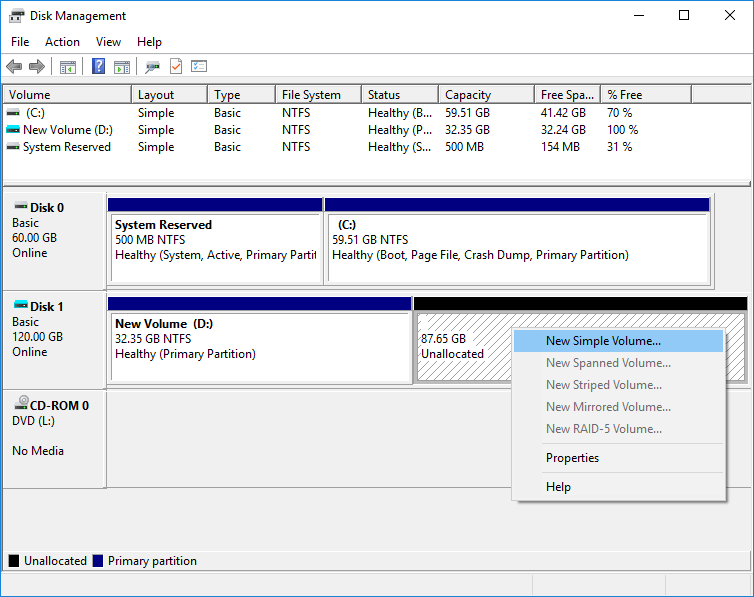
Step 4 Right-click on the unallocated space and select New Simple Volume from the context menu.
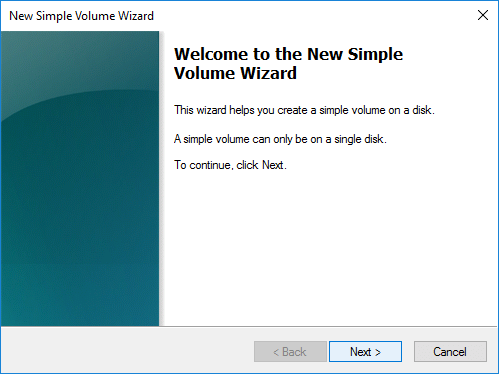
Step 5 Click "Next" button on the New Simple Volume Wizard which will guides you to create a new simple volume on the free disk space.
Step 6 Enter the size for the new partition and click Next to continue. The value you enter shouldn't be larger than the maximum free space. In the example, all unallocated space is allocated to the new volume, as picture below.
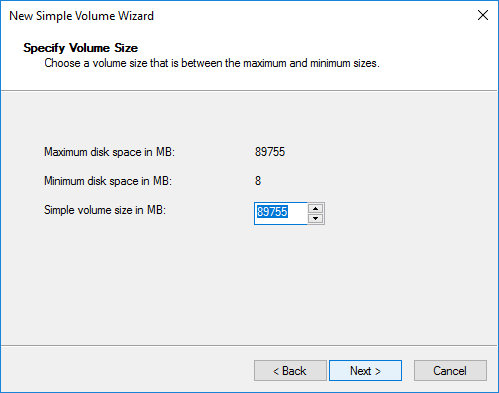
Step 7 Select a drive letter for the new volume and click Next.
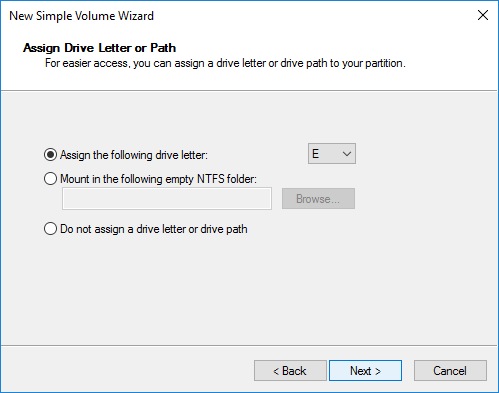
Step 8 Set formatting values for the partition and click Next. You can follow the default settings for File system, Allocation unit size and Volume label.
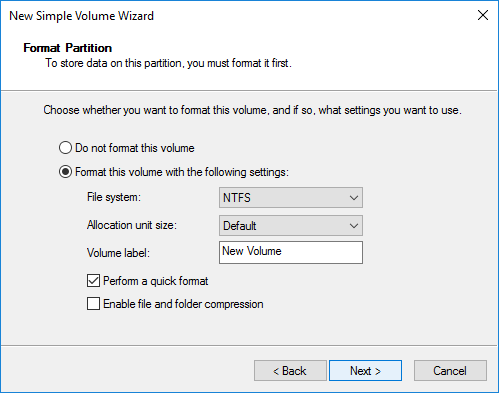
Step 9 Now you've successfully created a new partition. You can see parameters you set for the partition in the column. Click "Finish" to close the wizard.
Method 2: Partition a hard drive using free partition manager without data loss
In method 1, Disk Management partitions a hard drive through 9 steps, which is a complicated and time-consuming process. In fact quite a few users even do not know how to launch the Disk Management console. Thus we need an easier way to partition the hard drive without losing data in Windows 10/8/7. We suggest using Eassos DiskGenius to partition hard drive. This free partition manager software includes all features of Windows Disk Management console and it provides many advanced features such as resize / split partition, disk copy, convert between MBR and GPT without data loss, etc.

The following guide will show you how to use Eassos DiskGenius to partition a hard disk in Windows 10 and the process does not cause data loss. If you want to partition system disk, you can create a WinPE bootable disk and complete the operation in Windows PE. You can contact the support team to get the tool that helps you boot to Eassos DiskGenius's WinPE version. In this example, we'll partition a hard drive which contains a single partition.
Step 1 Install and launch Eassos DiskGenius to get the main interface.
In the main interface you can see disk and partition parameters in derails such as disk adapter, cylinder, cluster size, volume ID, $MFT cluster, etc. You can check hex data of the selected partition if you click "Sector Editor" tab.
Step 2 Right-click on the disk you want to partition and select "Split Partition". This function will divide current partition into two partitions without losing data.
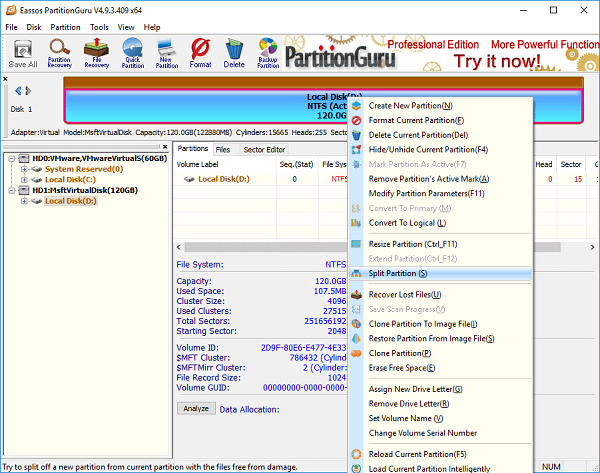
Step 3 Decide how much space you would like to move to the new partition, and click "Start" button. You can either enter the exact disk size or drag the arrow between partition bars to set the size.
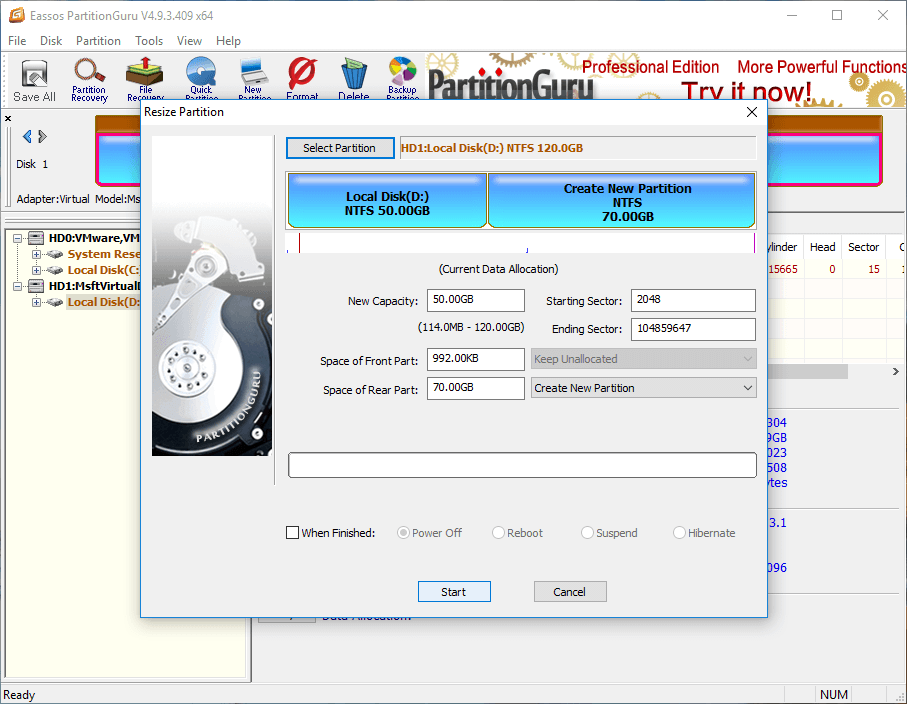
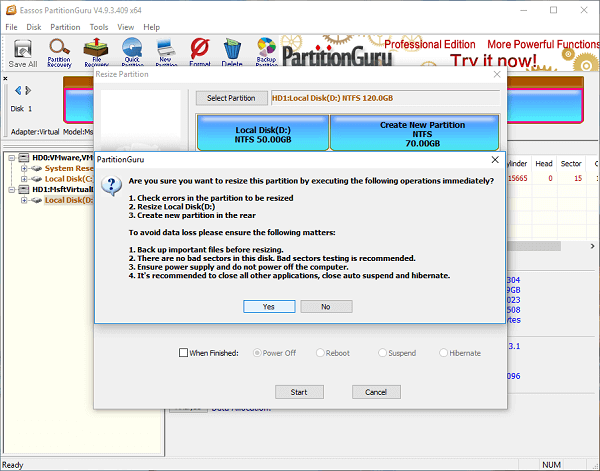
Step 4 Click Yes to continue. Before the software starts to split partition, please make sure there is not bad sectors on the disk, the partition does not contain any errors, and there won't be sudden power failure, etc.
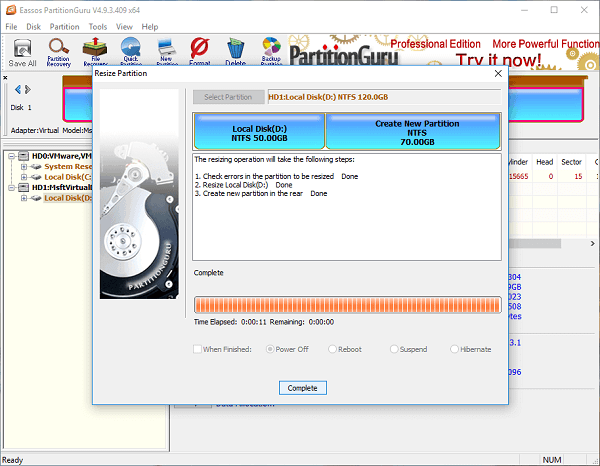
Step 5 Click "Complete" when the process is done. Please do not do any other operations while DiskGenius is splitting or resizing partition in case of any unexpected errors.
Method 3: Repartition a hard drive quickly
This method will repartition hard drive within a couple of seconds. It is easy and quick, but it removes all existing partitions and data on the disk and then creates new partition for the disk. Thus you should backup all files and folders in advance.
Step 1 Select the hard drive you want to partition and click "Quick Partition" button or press F6 key.
Launch Eassos DiskGenius and you can see all storage devices connected to your computer. Make sure you select the correct disk to partition, or you will have to face partition loss issue.
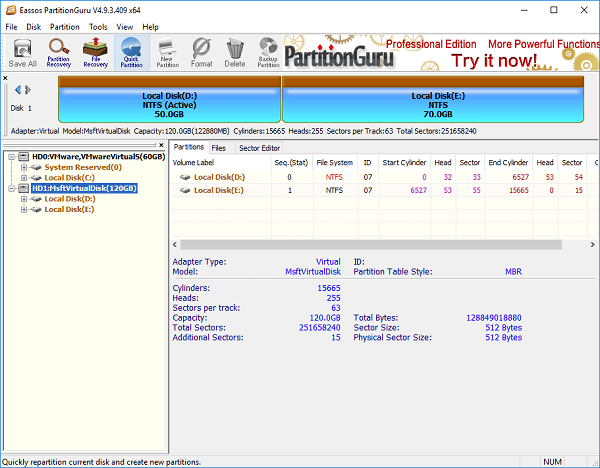
Step 2 Configure settings for new partitions and click "OK" button.
On the Quick Partition window, you can choose partition table format from MBR and GPT, decide how many partitions you need, select file system type for each partition and set partition size and labels. Do not forget to select the option "Align Partition to Integral Multiples of Sectors" which makes your disk 4K aligned.
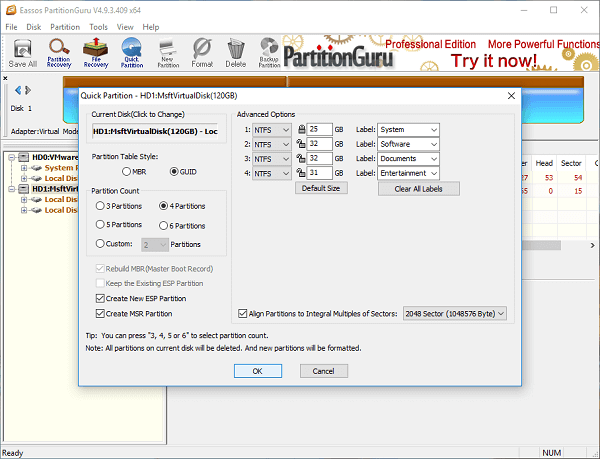
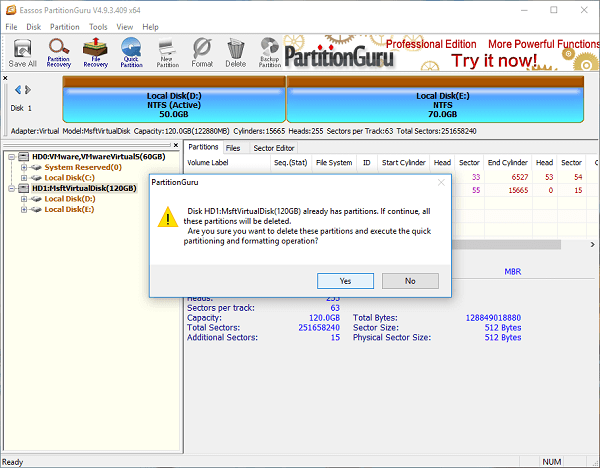
Step 3 Eassos DiskGenius prompts the rest actions will delete all data and perform formatting. If you have created backup, click Yes to continue.
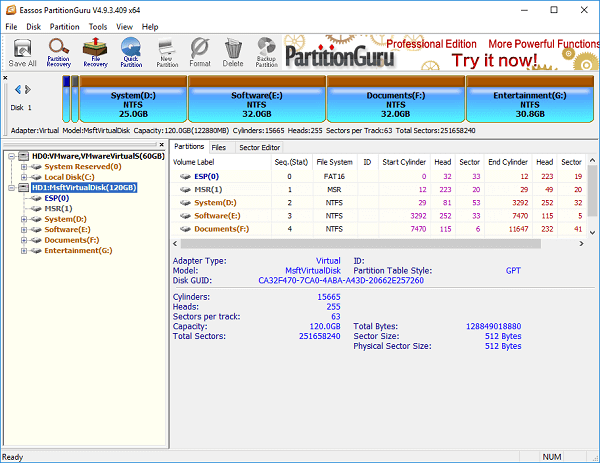
Step 4 Wait for several seconds and the partitioning completes. Now the 120GB disk which held one partition has been partitioned to GPT disk with 4 partitions.
Conclusion
This article introduces three methods to partition a hard drive using Windows Disk Management console and partition management software. You can partition a hard drive without data loss or repartition a disk in several seconds. If you have any questions about disk partitioning or need the tool to boot to Eassos DiskGenius in Windows RE, please feel free to send an email to our support team.





 Facebook
 X
X Youtube
Comments
shanmuka rider
2019-04-20 22:25:07
"HOW TO HARD DISK FORMULAS IN A EXCEL AND CALCULTOR PLEASE SEND IT MEE"
"HOW TO FORMULAS IN HARD DISK PARTITION IN A ENTER FIRST VALVE TO END VALES IN A HARD DISK PLEASE FORMULAS I REQUEST MEE"
kiran
2019-04-18 22:01:29