This article focuses on resizing Ubuntu partition without data loss, which can be an easy task if you follow steps in this page. Changing Ubuntu partition size can be done by different methods, and you learn two solutions to resize, shrink or extend Ubuntu partition. Also, you can use this guide to resize other Linux partition without losing data.
Resize / extend / shrink Ubuntu partition issue
It is common that partitions are created in unreasonable size or number, and we need to change partition size or number. Such issue happens to both Windows and Linux users. If a partition contains very large disk space, we can move capacity to other partition which is running out of free space. Usually operating system provides basic disk management tool which can resize partition. Besides, you can use third-party partition manager software to do the job, for it supports more files system which are not supported by the operating system running on your computer.
Ubuntu is a popular distribution of Linux operating system, and it is preferred by both individual and business users. Most users likes dual-booting computer by installing Windows and Ubuntu on same computer. Some users may want to resize either Ubuntu partition or Windows partition in order to make best of disk space. Here is a real-world case related to this issue:
“May computer is dual-booting Ubuntu and Windows 10, and all of them work properly without errors. Everything is good except the size of Ubuntu partition. When I set up Ubuntu, I allocated 300GB to the partition. I’m kind of regretting it, as the other partition is running out of space. Is there any way I can shrink Ubuntu partition without destroying data on the partition? If so, how to resize it in Windows or Ubuntu?”
Solutions to resize Ubuntu Linux partition without data loss
Two solutions to resize Ubuntu Linux partition
Since Ubuntu and Windows are different operating system platforms, you can do the partition resizing either under Ubuntu or Windows if your computer is dual-boot. In Ubuntu, you can utilize the built-in tool GParted to move or resize partition. If you feel this method is complicated, you can also resize Linux partition under Windows with the help of third-party software. Both methods mentioned in this article won’t damage data on related partitions, and you choose either solution that suits you better to complete the resizing task.
Notes you should know before changing Ubuntu partition size
There are a few things you need to pay attention:
If you dual boot Windows and Linux and you want to change partition size for Windows partition. For example, you may want to shrink Windows partition and give more disk space to Linux partition. You should resize partition under Windows. Do not trying making changes to your Windows partition with Linux resizing tool, as it is likely to destroy the Windows partition and cause data loss.
Though partition resizing methods introduced in this article do not damage data, it is still advised to backup all of your data before making any changes in case of any unexpected issues. It is easy to backup Ubuntu partition and Windows data, for example, you can clone partition, image partition or just copy important data to a different drive.
Method 1: Change Ubuntu partition size using GParted
This method uses GParted to resize Ubuntu partition. GParted is a free partition editor for graphically managing disk partitions, and it is able to resize, copy and move partition without data loss.
However, if you want to resize Ubuntu system partition, you cannot do it while system is running. In that case, you will need an Ubuntu live CD or USB drive to change the size of system partition.
If you do not have a CD or USB drive, you can create a new Ubuntu live media on your own. To make live CD, you should go to Ubuntu’s office site to download the ISO file and then burn it to your disc (right-click the ISO file and choose Write to Disc); if you want to use USB drive for this task, you can create the live media with Startup Disk Creator. Type “USB” in the searching box and you can find the application. Provide the app with the Ubuntu ISO file and the Live USB drive will be created.
Step 1: Boot your Ubuntu system from the live CD or USB drive you just created.
Insert the live media and restart system, and it should boot from the media. If the live CD or USB does not work correctly, you need to open your computer’s BIOS to change boot order. Make sure the live media is set in the first boot order.
Step 2: Launch GParted. GParted is a Gnome-based partition manager and it is not pre-installed on an Ubuntu system by default. But it is included in the Ubuntu live environment. Thus you can launch it from the Dash.
Step 3: Select proper disk. If there are more than one hard drives on your computer, you need to select the disk which contains the partition you want to resize from the drop-down list at the top-right corner.
Step 4: Locate and right-click the Ubuntu partition to be resized, and select “Resize/Move” option from context menu.
Step 5: Set partition size you want to change. You can click and drag handles at the side of partition bar or enter the exact number to set the value.
Step 6: Click “Resize/Move” button and wait for the process to complete. You can view progress at the bottom of the GParted window.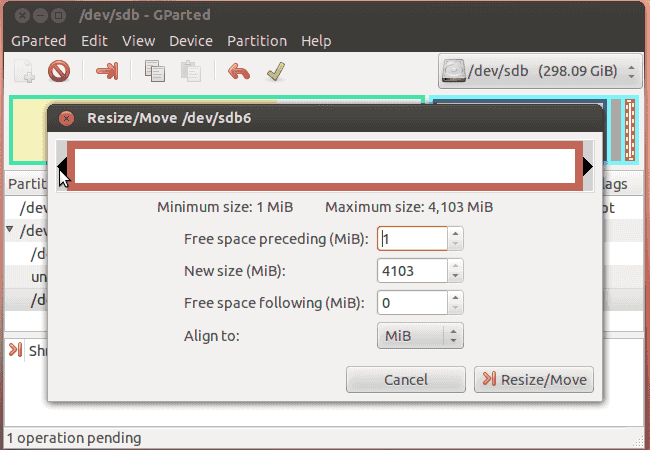
Step 7: Deal with free disk space. Once the partition is shrined, you can see unallocated disk space, and you can either create a new partition on it or add it to current partition.
Method 2: Resize Ubuntu partition without data loss with Eassos PartitionGuru
This method shows how to resize Linux partition without data loss under Windows 10/8/7/XP. Since Windows Disk Management does not support resizing Linux partition, we’ll complete the task with the help of a free Windows partition manager – Eassos PartitionGuru. This partition manager provides full support for Linux partitions and it can do following operations for you:
- Expand/split/resize Linux (ext2/ext3/ext4) partitions without data loss;
- Ext4 recovery: recover deleted/lost ext4/3/2 partitions and restore partition table
- Full access to Linux partition: read & write ext4 Linux partition
- Backup & image ext2/ext3/ext4 Linux partition or hard drive
- Create / format ext2/ext3/ext4 partition in Windows
- Completely wipe data from ext4/3xt3/ext2 partition or disk to protect privacy
Next, we’ll resize Ubuntu partition using this tool. To do that, you need to boot your computer to Windows first.
Step 1: Install and launch Eassos PartitionGuru, and then you can view all disks and partitions in your computer.
Step 2: Select the Linux partition you want to change size, and click “Resize Partition” option from Partition menu.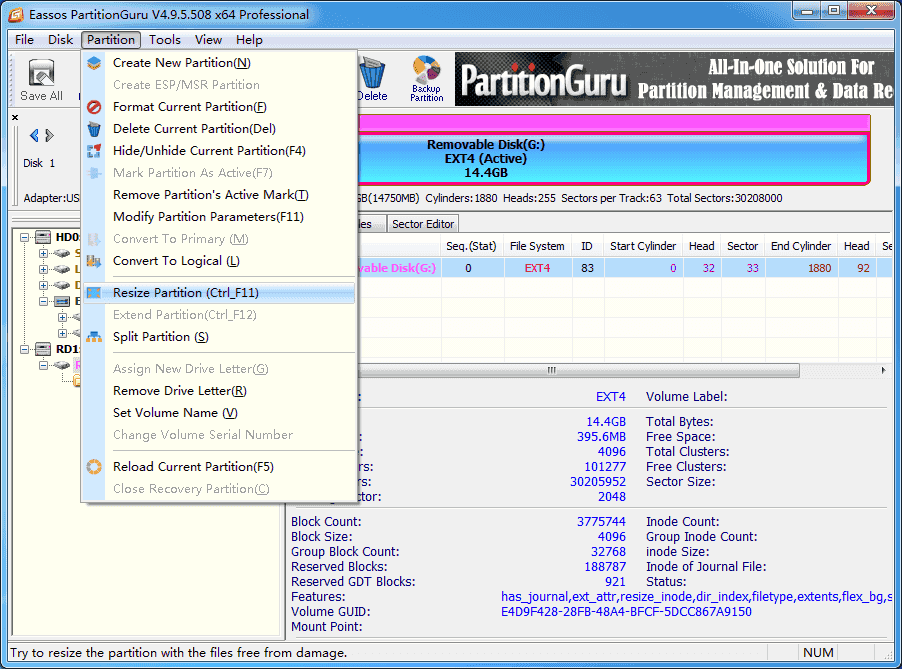
Step 3: Enter partition size you want to change and click Start button.
You can drag the arrow between partitions or enter the exact number to decide the disk capacity you want to transfer.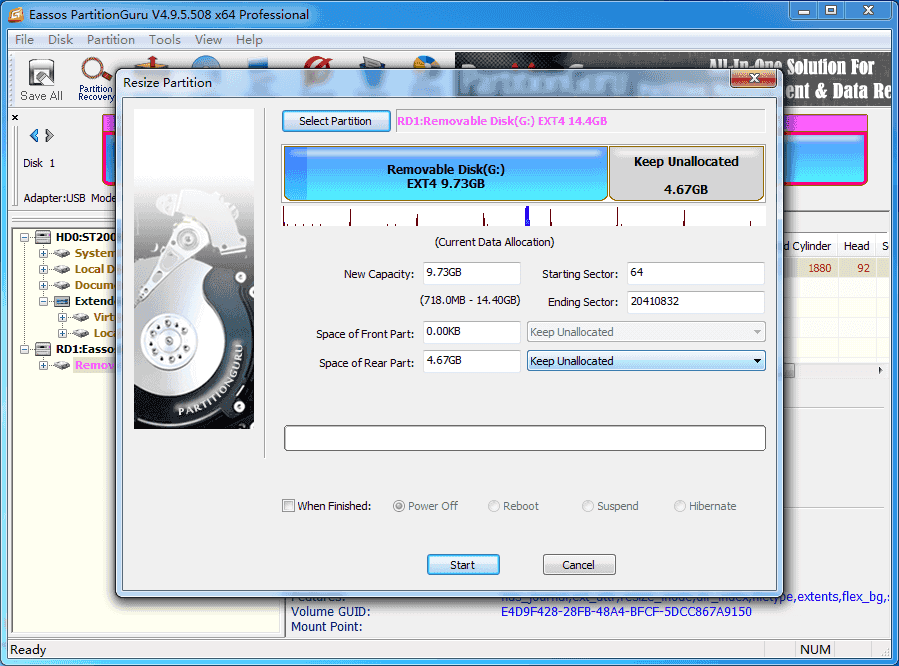
Step 4: Wait for a while and the resizing process completes.