Disk partitions
Partitions on hard drive are also called volumes, which are created to store data. If your computer is running Windows, then one of the partition of the hard drive or SSD (solid state drive) includes a partition named as C: where the operating system installs. Other partitions are used to keep applications and personal data such as photos, music, documents, videos, etc.
At some point, computer users may bear the thought of repartitioning their hard drive, which is probably out of the purpose of increasing performance and efficiently managing data. When a new hard drive is partitioned, it can be used to install system as well as store various data. However, what if the hard drive already has partitions and files stored? So it is important to know how to repartition a hard drive without losing all data off the drive.
Free partition manager software to repartition hard drive
Any software that claims repartitioning doesn’t cause data loss should be avoided. Therefore, the program you choose should have the ability to help you backup data and partition hard drive. PartitionGuru is such kind of partition manager. This program is able to partition hard drive, clone hard drive to another with all files and installed programs. Also, it can help you image partition which can backup partition (either system partition or data partition) to an image file. Besides, it can resize partition, change partition type, convert partition table type, etc. Users can employ all features easily without worrying about complicated steps. Here is detailed guide to reparation a hard drive.
How to repartition a hard drive using PartitionGuru?
Step 1: Download and install the free partition manager to computer or a USB drive. Since the repartition erase everything of the drive, the program shouldn’t be installed to the hard drive that you plan to partition.
Step 2: Start PartitionGuru and you can see the main interface which shows all drives connected the computer and partition details.
Step 3: Select the drive click the button “Quick Partition” on the tool bar.
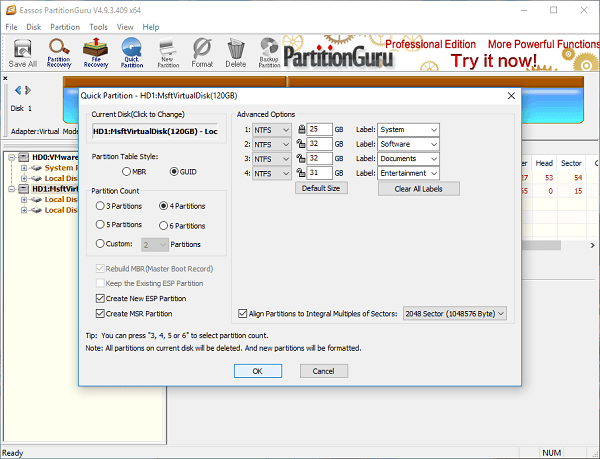
Step 4: On the windows popped up, you can select partition table style and partition number and set partition size, type and label. Also, the item “Align Partitions to Integral Multiples of Sectors” is checked by default to make hard drive aligned to 4K sectors. Then Click “OK” button.