


How to fix "The disk is write protected" error on USB drives?
This article is going to talk about "The disk is write-protected" error on USB flash drive and SD card. It explains possible causes and solutions to remove write protection for USB drive and retrieve data when this error occurs. If you are troubled by this issue for the moment, you can read this guide before giving up the disk.
 What is "write protection" on USB disks?
Causes of USB write-protected error
How to add write protect to a flash drive?
How to remove write protection from read-only USB drive?
 Solution 1: Check the drive for a physical lock
Solution 2: Disable write protection in Registry
Solution 3: Use Command Prompt to remove write protection
Solution 4: Check account permission
Solution 5: Make sure the USB drive isn't full
Solution 6: Ensure your USB drive is free from virus
Solution 7: Format the disk write-protected disk
Solution 8: Verify bad sectors
How to recover data from write-protected flash drive?
Free flash drive data recovery software
Steps to recover data from write-protected flash drive
What is "write protection" on USB disks?
Write protection on USB flash drives or SD cards is a handy function aiming to prevent accidental file deletion and block suspicious files like virus and un-authorized sources. External data storage devices are very common devices and they are widely used these days, as they are portable and users can take them anywhere they want. When a USB disk is write-protected, it turns into read-only. In that case, any action to add or edit data into that disk will be denied. All attempts related to writing action will be prevented, such as add or create new file, edit existing data, delete files that already present, formatting current USB disk, etc. Another reason people only give readable access to their storage device is to prevent others from sharing content stored on the disk.
When you try to write data to such disk you'll get error message "The disk is write-protected. Remove the write-protection or use another disk." as shown in the picture below.

However, this feature may become a headache if it is not properly used or USB drive is corrupted. In that case, the error "The disk is write protected" will drive you crazy, as you can't access data on that USB drive and the only option to fix it might be format write-protected USB complete, which won't be an easy job. What's worse, if files on that drive are important to you, formatting won't be a wise choice, for formatting wipes data. Thus you need to disable or remove write-protection from USB disk first. Let's look at a real case found from a forum:
"I recently bought a new laptop that installs Windows 10. I have four USB flash drives and one of them is now marked 'write-protected' for no reason, as I didn't do anything to it. I found a solution for windows XP and tried on my own computer. But it didn't remove write protection. I just want to copy files from the USB disk to computer and then reformat it. Can you help me on the write protection removal thing on Windows 10 computer or retrieve data?"
Causes of USB write protected error
This error may appear for several reasons and this section lists the most common ones.
Read only switch
Many memory cards and USB flash drives have a small physical switch on the side edge. The switch is used to set write protect and makes the drive read only.
The flash drive is full
If the flash drive is full of files and does not have free space and it is likely to be write-protected. You can right-click on the disk and choose Properties to check how much free space available on the drive.
Security settings
Some computer uses or administrator of the machine set security setting on computer to prevent actions to write data to a USB disk. You need to remove such settings by modifying settings in registry.
The Read-only property
If you set files or folders on existing on the drive to "Read Only", you'll receive this error message when copying, editing or replacing files. In that case, you need to navigate to file Properties to check whether the "Read-only" option is selected.
Virus attack
Virus can infects everywhere data exists and cause various issues such as data damage, file loss, system crash, storage device failure, etc.
Drive is broken or has bad sectors
If causes mentioned above can't account for your case, it is likely your removable disk is broken or gets bad sectors. The disk might be old and just reaches its natural lifespan, as many disks have limitations on the amount of reading and writing data. Besides, normal read or write actions can't be done to bad sectors, thus you may need to seek help from disk verifying tools.
How to add write protect to a flash drive?
If you have stored some important data on your flash drive, then it's a good choice to enable the write protection before inserting it to computers which is not well protected by an-virus software. There are chances that flash drive infects virus when connecting to public computers. Although write protecting on USB drive is not the foolproof action to prevent people from editing or deleting your data if they know how to disable this feature, it is better than keeping flash drive in open mode. Here is a handy tutorial to add write protect.
Method 1:
Examine the flash drive or memory card and find out the switch. You can move the switch to the lock location to enable the write protection for the device.
Method 2:
Set drive security permissions
Step 1 Right-click the drive letter associating with the flash drive in Windows Explorer and select "Properties" from context menu.
Step 2 Click Security tab on the Properties Window, select "Everyone" under Group or user names and click "Edit" button.
Step 3 On the "Permissions for Removable Disk" Window you can see a section named "Permissions for Everyone" and two columns of check boxes. Check those under "Deny" for items like Full Control, Modify and Write.
Step 4 Click Apply and then Ok button.
How to remove write protection from read-only USB drive?
Solution 1: Check the drive for a physical lock
Many USB drive and SD cards have a physical lock switch which can turn on and turn off write protection. Thus you need to examine whether the flash drive enables this lock. Check the left or right edge to find out the switch. If the switch is in the Lock side, just move it to the unlocked position. If this method can't solve the write protection error, please try following solutions.

Solution 2: Disable write protection in Registry
Editing registry is another way to fix "The disk is write protected" error. Write protection can be enabled in Windows registry and it is not easy to write on USB devices. If you disable this feature via registry editor you can regain read and write privileges on removable drives. Here are the steps you can follow.
Step 1 Open Registry Editor. Click Start button and enter "Regedit" in searching box and press enter key. If you see prompt given by user account control, click Yes. Alternatively, you can get Registry Editor by typing Regedit.exe in Run command which can be opened by pressing Windows and R keys.
Step 2 In the left part of Registry Editor, navigate to:
HKEY_LOCAL_MACHINE\SYSTEM\CurrentControlSet\Control
Find out StorageDevicePolicies and open it. If it does not exist, you can create one. Right click on Control and choose "New" and "Key" and name it as StorageDevicePolicies.

Step 3 Click StorageDevicePolicies key in the left and right-click the empty area on the right side. Select New and DWORD (32-bit) Value. Then change its name to WriteProtect.

Step 4 Double click the WriteProtect key and enter 0 in the Value data box and click OK. Close Registry Editor and re-plug your USB drive.

Solution 3: Use Command Prompt to remove write protection
Read and write attributes of UBS disk can be modified from Windows Command Prompt with the help of a simple command line. You can follow steps here to clear write attribute for flash drive or SD card.
Step 1 Open Command Prompt.
Click Start button and enter cmd in searching box. Then right click "cmd.exe" from the searching list and choose "Run as administrator". Click Yes, if you get UAC prompt.
Step 2 Type in diskpart and hit Enter.
Diskpart command is a Windows built-in tool for disk partitioning and it is able to change values related to USB drives. If you got the error "The request could not be performed because of an I/O device error. See the System Event log for more information", the storage device might be physically damaged.
Step 3 Type the following commands one by one and press Enter key after each command.
list disk
select disk #(# is the disk number for your USB drive which reports "The disk is write protected" error. In the screenshot below, we should type select disk 1)
attributes disk clear readonly

Step 4 When you see "Disk attributes cleared successfully", you can close Command Prompt and re-plug USB drive to check whether the issue is resolved.
Solution 4: Check account permission
The reason that you get the write protection error might be drive permission issue. It is possible that you didn't provide permission to access particular storage device, so you need to make sure you have set write privileges properly for user account.
Step 1 Open Command Prompt.
Open the Properties of USB flash drive by right-clicking and selecting Properties.
Step 2 A window named Removable Disk Properties appears and you need to click "Security" tab. In the Permission for Everyone section, check whether the "Write" feature is marked with a tick.
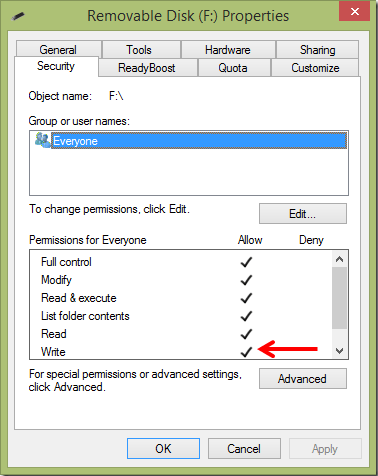
Step 3 If there is not a tick next to Write feature, select the use account and click button Edit. Click on Add and then enter the object's name and click OK.
Solution 5: Make sure the USB drive isn't full
If your USB drive is running out of space, you may also get the write protection error message when copying files to this device. You can see the free space on the disk via checking it Properties on computer.
Step 1 Double click Computer / This PC from desktop to open Windows Explorer.
Step 2 Find your USB drive and right-click on it to select Properties. Then you can see a pie chart showing Used space and Free space.
Solution 6: Ensure your USB drive is free from virus
It happens that flash drive may not be readable or writable if it infected by certain virus. Every time you plug a USB drive to your computer, you need to scan it for virus or malware, especially after it is used on public computers. Virus can delete or mess files, fill USB drive with nonsense data or make drive unreadable. Thus you can manually scan the flash drive with antivirus software and eliminate all possible malware and virus.
Solution 7: Format the disk write-protected disk
In most cases, you can't format write-protected disks, as formatting process writes new file system. When you try to format the drive, you'll get errors like "The disk is wrote-protected" or "Windows was unable to complete the format". You can try the method here to format it.
Warning: Formatting the drive wipes all data on it. If files on the drive are important to you, you should recover data before performing formatting.
Step 1 Restart computer and press F8 before computer boots to system. Select Boot Into Safe Mode option and press enter key.
Step 2 Press Win key + R to open Run dialog. Type in cmd in the Run window and press Enter to get a black window.
Step 3 Type format f: (F is the drive letter of your removable storage you want to format) and press enter. Be aware that if you enter a wrong drive letter, it'll erase all data of that drive.
Solution 8: Verify bad sectors
Bad sectors on hard drive or flash memory are neither accessible nor writeable due to physical or logical damage to disk platters, flash memory or transistors. If a disk contains bad sectors, it'll become slow or stop working normally. You can follow this guide to verify bad sectors for your storage device.
Step 1 Install and run DiskGenius Free and find the USB drive in question in the software. Select the drive and click menu "Disk" to select "Verify or Repair Bad Sectors".

Step 2 Click "Start Verify" and the software starts to scan bad sectors. Finish verifying bad sectors, DiskGenius will report the number of bad sectors.
Step 3 If the USB drive does have bad sectors, you can try repairing them with this free partition manager. Please note that bad sector repairing damages data stored on or near bad sectors, thus you need to backup data first before repairing.
How to recover data from write-protected flash drive?
Free flash drive data recovery software
If you are looking for free and full-featured flash drive recovery software to get back files and folders from a write-protected removable device, you are at the right place for the correct tool: CuteRecovery Free. This free data recovery software recovers data in a read-only manner and does not disturb lost data, thus the recovery process is safe and reliable. This user-friendly and free flash drive recovery software is able to recover data from flash memory, Secure Digital card, Compact Flash card, mp3, memory stick, mp4, SSD, HDD, etc.

Reasons for choosing CuteRecovery Free
- It's free of charge for all users.
- It's easy to use. The installation and data recovery process is guided by wizard interface. Inexperienced users won't have any difficulty in getting back lost data.
- Four functional modes are provided to help users deal with almost all data loss problems.
- It works perfectly under all Windows systems and it's able to retrieve data from various storage devices.
- It provides file preview feature which helps user check whether files are damage before actual recovery.
- Eassos data recovery software has a specialized technical support team and you can reach them via email anytime you need help.
Steps to recover data from write-protected flash drive
Before we start recovering data you need to connect your USB drive to computer and ensure it can be recognized in Windows Explorer. Download and install CuteRecovery Free to computer hard drive.
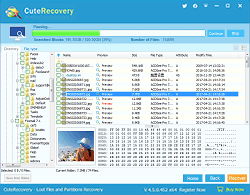
Step 1 Launch CuteRecovery Free and select proper recovery feature. Both "Recover Files From Partition" and "Recover File From Disk" are workable to get back data from flash drive.
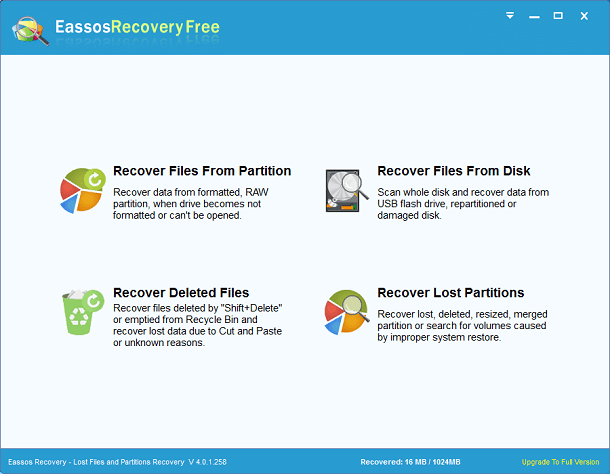
Step 2 Choose the USB drive and click "Next" button to start searching for files.

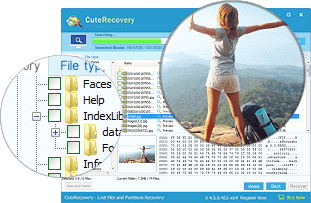
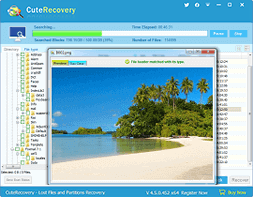
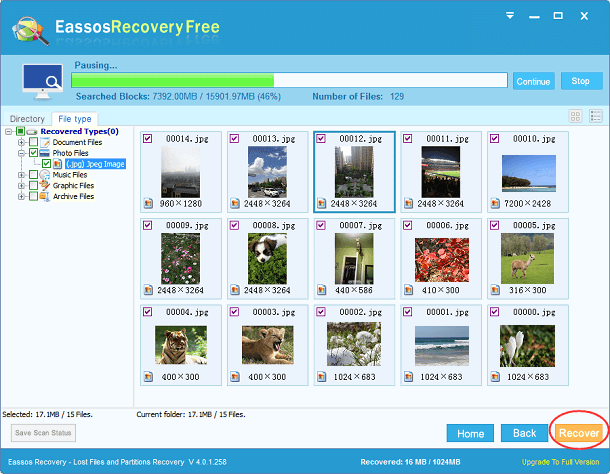
Step 3 Select files you need and click "Recover" button to get files recovered. CuteRecovery Free lists recoverable files while it is scanning selected drive so that you can preview files easily. If all needed files have been found out, you can pause canning process and recover data.


 Facebook
 X
X Youtube