


What is the fast user switching feature? How to disable fast user switching easily in Windows? You can find answers to these two questions in this article. This guide explains this feature and tells how to disable it using different methods step by step. As settings are different in different Windows edition, content in this article is divided into several parts and you can click links in catalogue to reach related topics. Make a follow up with steps here to disable fast user switching with easy solutions.
 What is Windows fast user switching feature?
 Understand user accounts
Fast user switching
Why fast user switching might not be desired?
Disable fast user switching in Windows 10
For Windows 10 home edition users: use Registry Editor
For Pro or Enterprise edition users: use Local Group Policy Editor
Disable fast user switching in Windows 7/8/Vista
Disable fast use switching in Windows XP
Conclusion
What is Windows fast user switching feature?
Fast user switching is a useful feature in Microsoft Windows if you have multiple users, as it makes it easier to share a computer. It allows more than one users to log on a single computer at the same time and switch accounts directly without having to close all programs and log off beforehand. Plus, tasks done by one user are not disturbed by other users.
Understand user accounts
A user account allows you to sign in computer, and there is already one user account by default, which is created when you set up your computer. Also you can create additional separate user accounts for other users in order to share same computer. Speaking of which, you might ask why not just use one account. If you share computer with multiple people, such as your children and guests, you'll have to share same application settings, files and system permissions when there is only one user account on your PC. More specifically, when you use a single user account, all people using the computer will use the same browser. In that way, everyone is able to use your online accounts if it is not signed out, view browse history and bookmarks. If users have separate user account, they will have their own browser and cannot log into browser used in other account. The same is true for other programs, such as email. Thus for security reasons, many users create multiple accounts for different users.
Generally, there are three kinds of accounts: administrator, standard and standard with family safety. Administrator account is a special user account which exists on all computers and has full access to all settings on computer. It is able to make changes to system settings, modify security settings, install software or hardware and access all files stored on the computer. Besides, Administrator can manage or make changes to other people's account. Standard account is a kind of basic account for those who need to do normal everyday tasks such as run applications but who should be limited in administrative access to computer. The last user account is for children, as it enables parental controls. Thus you can create a standard account for each kid and then go to Control Panel to set up how child will use the PC, such as control websites child can access online, control when child uses the PC and set game restrictions.
At this point you might be wondering how to add and manage user account for your computer. The process is a little bit different on each version of Windows. This section will introduce steps to create a new user account on Windows 10. Before that, you should sign in Windows as an Administrator which is the account created during setting up computer. Click the Start button to select Settings > Accounts > Family & other people > Add someone else to this PC. If your computer installs Windows 10 Enterprise edition, you should select "I don't have this person's sign-in information" at the bottom of the page, and then select "Add a user without a Microsoft account" on next page. Then enter a user name, password, password hint and click "Next".
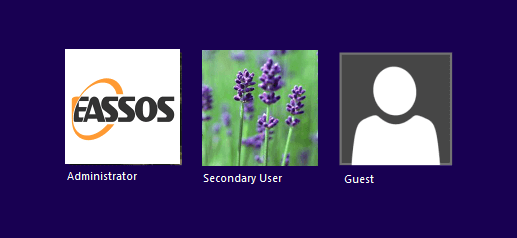
Fast user switching
If you have multiple user accounts, you can select which to log into from the Windows login screen. In addition, you can switch between accounts without signing out or closing current applications, which means programs on the original desktop will remain running. That's because each user accounts has its own separate folder to store personal files like downloads, desktop folders, my documents, etc. Most software stores its data and settings in a user-specific application folder, thus each user will have their own application settings and data.
Microsoft Windows operating system provides a useful feature, fast user switching, which allows users to quickly switch between different user accounts. If you are working on your PC and others want to login to their account, you can simply switch user account and keep your word and applications in the same status when you switch back. Thus you can switch back and continue your tasks easily without rising closing programs and losing data after other users complete their tasks. Otherwise, you may have to perform hard drive recovery once data loss issue occurs.
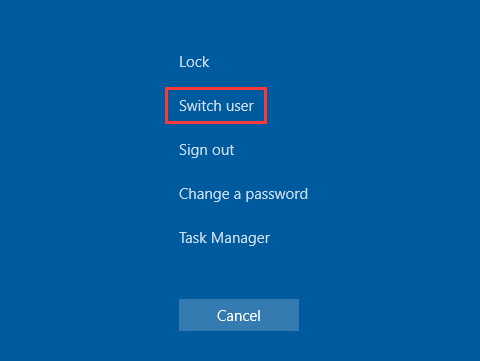
Fast user switching is quick handy and easy to use. There are several approaches to switch user accounts, and all of them are easy to follow. You can click Start button and select user icon from the start menu, after which you are able to choose another user account. Also you can press shortcut combination keys Ctrl + Alt+ Del to select "Switch user" option. No matter which method you use to change user account, you can go to the login screen and select the account you need.
Why fast user switching might not be desired?
If there are multiple users registered on your computer and the fast user switching feature will be very useful. The advantage of this function is that it enables all users to do their work on a computer without having to close apps being used. Besides, works done by other users won't be interrupted if you enable fast user switching feature.
There is no doubt fast user switching is a great feature, but many users are trying to disable it anyway, and "how to disable fast user switching Windows 10" has been a hot topic these days. You might ask why it is not desired. The major reason is that if it is not used properly, it can lead to issues for example computer becomes slow. When you switch user accounts, all data and application on these accounts remain running and continue taking up resources. In that case, if there are too many accounts logged in simultaneously and each keeps using various applications, you will encounter a problem that the computer runs out of memory and becomes slow.
Moreover, if other accounts are signed in, you also can't shut down or restart computer before signing out; if you shut down computer directly without signing out switch users, all running programs and unsaved files will be lost. Therefore, many users want to disable fast user switching feature in order to gain better performance via logging off accounts which you no longer use.
Next section will explain how to disable fast user switching feature in Windows 10/8/7/Vista/XP. As all steps are not the same on each Windows edition, the guide will be divided into three parts. Please note that all these methods do not actually disable this feature in Windows. In fact, they just hide all options or buttons you can click to switch user account, so that you would not be able to find a place to switch account. Thus the fast user switching is disabled.
Disable fast user switching in Windows 10
If you are using Windows 10 Home edition, you'll have to disable this feature by editing Windows Registry, while if you have Windows Enterprise or Pro, you can make changes via either Registry Editor or Local Group Policy Editor. If you have Pro or Enterprise, we recommend Group Policy Editor, as it is easier than editing registry. How to check what version of Windows 10 you are using? Click Start button to search for "About your PC", then hit it. On the Setting window you'll have a clear idea of Windows 10 version as well as system type on your computer.
For Windows 10 home edition users: use Registry Editor
Warning: Registry Editor is an essential tool to computer, but incorrect use can lead to serious problem, such as render system unstable or even require reinstalling Windows. We cannot guarantee problems caused by misusing of Registry Editor can be solved. However, as long as you stick to this guide you should not have any problems. If you do not feel comfortable with this method, you can ask an advanced PC user to do it for you.
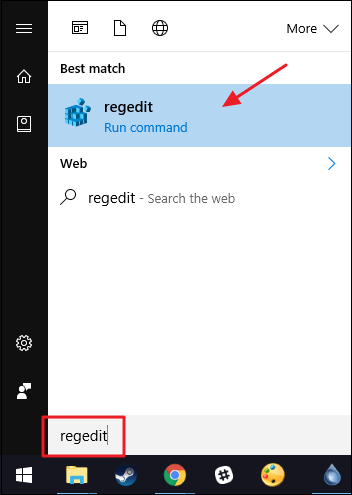
Step 1 Open Registry Editor to get started. Click Start button, type "regedit" without quotes to search box and press Enter key.
Step 2 In the Registry Editor, navigate to the following key from the left sidebar:
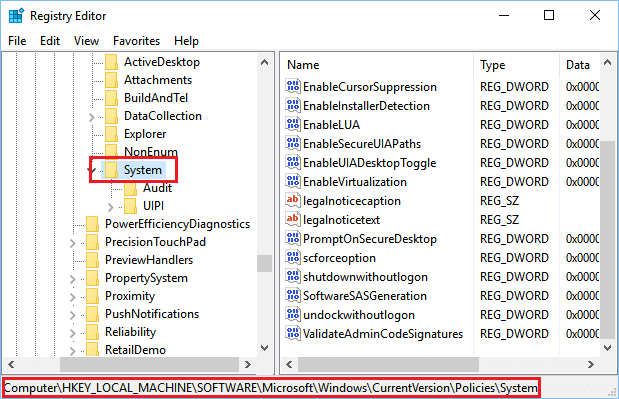
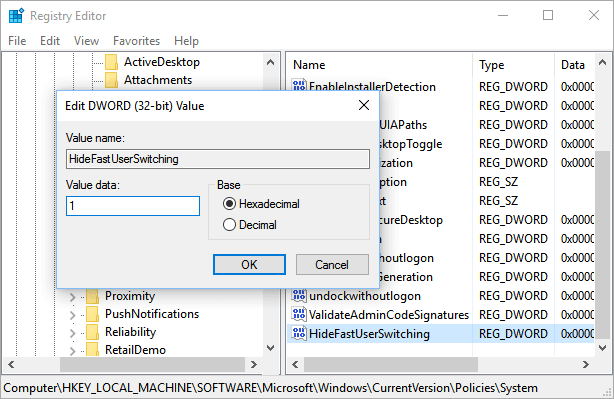
Step 3 Select "System" to look for entry "HideFastUserSwitching" on the right side. Then doubt-click on the entry to open properties window, and you can change the value in "Value data" from 0 to 1. Click OK button to save changes.
Step 4 Close Registry Editor and restart computer. Then you can test whether fast user switching is disabled or not.
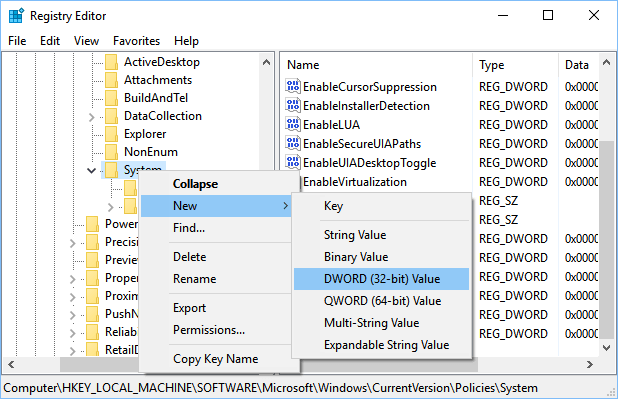
Note: if you can't find entry " HideFastUserSwitching" in step 3 , you'll have to create one manually. Right-click on "System" and select "New" > "DWORD (32-bit) Value"; rename the newly created entry as "HideFastUserSwitching".
For Pro or Enterprise edition users: use Local Group Policy Editor
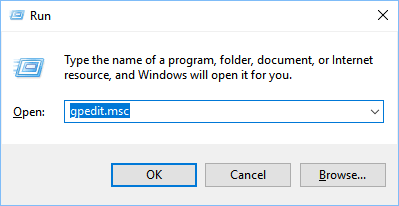
Step 1 Open Local Group Policy Editor. Press Windows + R to get Run dialog box where you should type in "gpedit.msc" and click "OK". After that, Local Group Policy Editor will open.
Step 2 Browse the directory in the left sidebar of Local Group Policy Editor and expend follow path:
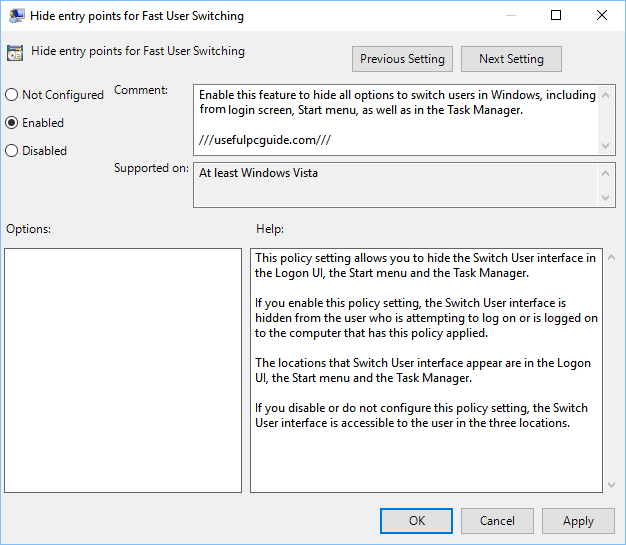
Step 3 Select "Logon" and you can find "Hide entry points for Fast User Switching" item on the right side. Then double-click it.
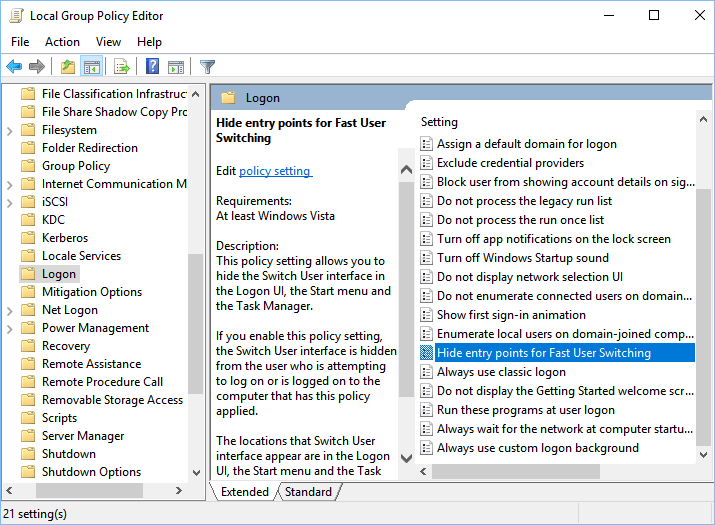
Step 4 A new window called "Hide entry point for Fast User Switching" will pop up. Choose "Enable" option and click "OK" button.
Disable fast user switching in Windows 7/8/Vista
If your computer haven't upgraded to Windows 10, and want to disable this function for your PC, you can follow steps above. There are not too many differences on these steps. Whereas, it should be noted that the Local Group Policy Editor is not available on some Windows 7 or 8 editions, for example, Home Edition.
You can try the Local Group Policy Editor first to disable fast user switching for Windows 7/8/vistas first; if that does not work on your computer, I would recommend the Registry Editor to complete the task.
Disable fast use switching in Windows XP
Method 1: Use Control Panel
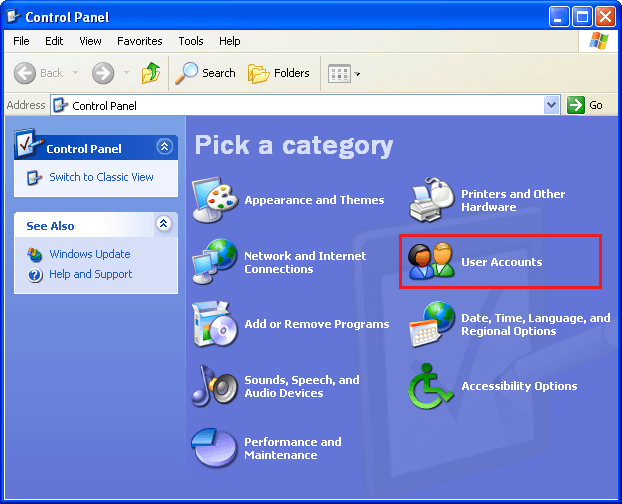
Step 1 Click the Start button and select Control Panel option. Then click "User Accounts" in Control Panel.
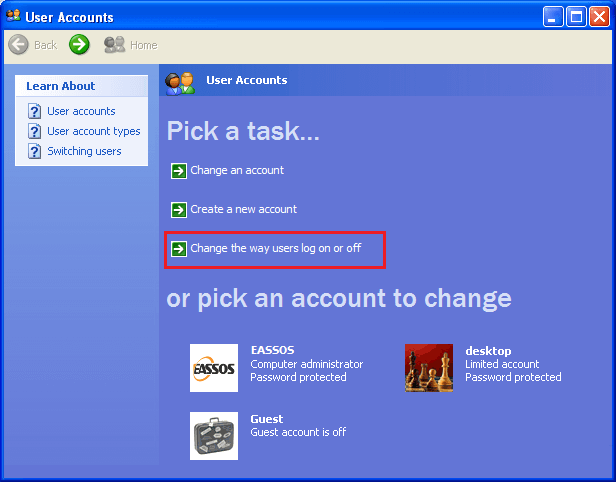
Step 2 Now you should click task "Change the way users log on or off".
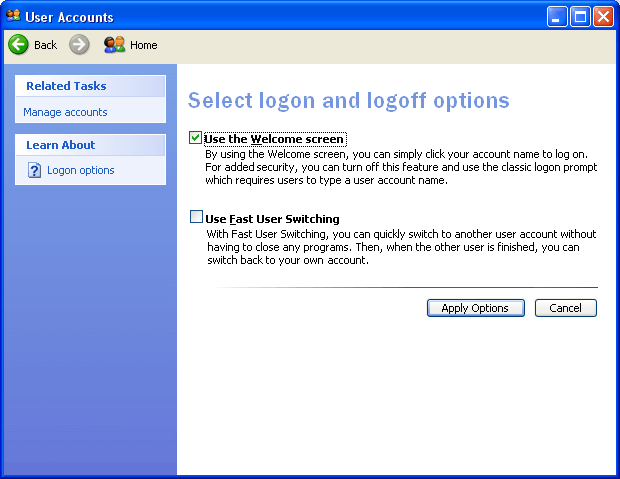
Step 3 To disable Fast User switch, you should uncheck "Use Fast User Switching" option and click the "Apply Options" button.
Method 2: use Registry Editor
Step 1 Press Windows key and R from keyboard to open Run box. Type regedit.exe in it and click "OK" button.
Step 2 On the left side of Registry Editor, expand the following address: HKEY_LOCAL_MACHINE\SOFTWARE\Microsoft\Windows NT\CurrentVersion\Winlogon.
Step 3 Now you can find "AllowMultipleTSSessions" value on the right part. Double click it to view its properties and change the data value from 0 to 1.
Note: if there is not "AllowMultipleTSSessions" on your computer, you can create one by yourself. Right-click on "Winlogon" and click "New" > "DWORD"; when it is created successfully, you just need to rename it to "AllowMultipleTSSessions".
Conclusion
Fast user switching is quite a handy function for users, and yet if your computer is old with less RAM and you feel this feature is not necessary, you can disable it following methods above as per your device. You can do that easily by modifying the registry or editing group policy. We hope you find this guide useful for you, and you can share the article via Google Plus, Twitter or Facebook. If you have any questions or ideas regarding methods to disable fast user switching, you can use the comment section below to discuss your point or contact our tech support via Email.


 Facebook
 Twitter
 Youtube
Comments