This post talks about method to use diskpart delete partition in Windows 7. Diskpart is a useful system utility to create, format, resize or delete partitions. In this article you can see how to delete volume with diskpart in Windows 7/8/10 step by step. Apart from that, other methods to delete partition will be introduced.
About diskpart deleting partition
Removing partition is one of the common operations you might do when manage disk & partition for your computer. There are multiple methods to delete partition in Windows, such as remove partition via Disk Management, diskpart command or third-party tools. Once a partition is deleted, all files and folders in that partition will be removed together. Thus, if files are not backed up, you’ll have to deal with data loss issue after deleting a partition. No worries, the ending part of the article includes a guide to recover lost or deleted partitions.
Reasons to remove partition on Windows 7/8/10
Here are some possible reasons why users want to delete partition on hard drive:
- There are too many partitions on your hard drive and you want to delete some partition to organize data better. If your hard drive contains too many volumes, you might be difficult in finding specific files efficiently.
- You want to restore USB drive back to full capacity. Windows operating systems, except for Windows 10 which has installed the latest update, can recognize the first partition even though the USB drive contains multiple partitions. In that case, if you want to make full use of all capacity on USB drive, you may have to delete all partitions and then recreate single partition on it.
- You do not want to partition anymore and do not need all data on the partition.
- You want some free disk space to extend another partition or create a new partition.
- The partition is corrupted or damaged and you may want to delete the damaged volume to resolve the problem.
Steps to delete partition using diskpart in Windows 7
- Launch Command Prompt. Click Start menu and type cmd in searching box; then you can see cmd.exe in the searching list, right-click it and choose “Run as administrator”.
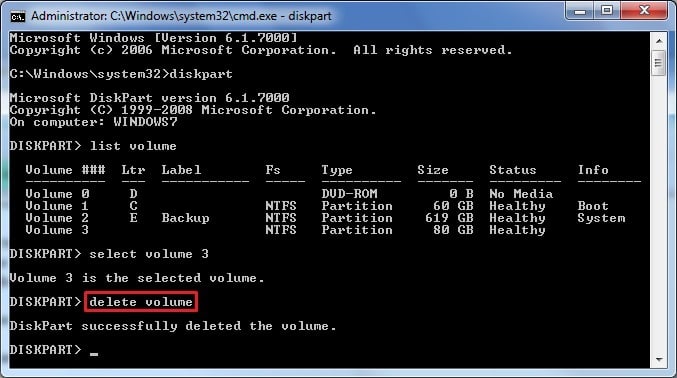
- The Command Prompt windows opens up. Type diskpart in it and press Enter key.
- Type list volume command and hit Enter key. This command will list all partitions on your computer.
- Type select volume # and press Enter. # is the partition number, and you should replace # with the partition you want to delete.
- Type delete volume and hit Enter. This command will delete the partition you select in step 4.
Things you should note regarding diskpart delete partition:
- Do not try diskpart command until you have fully backed up files on the hard disk.
- Deleting partition or formatting partition causes data loss. If you delete partition by mistake, you should try partition recovery as soon as possible.
- Diskpart cannot delete system partition while Windows is working. In that case, you can delete partition with diskpart in Windows RE.
Delete partition in Windows Disk Management
Disk Management is provided by Windows system, and it is able to complete basic operations like delete, create and extend partition. Thus you can delete volume in Windows 7 with Disk Management.
When you delete a volume, all data and configuration of the volume will be deleted including all shared folders. If the volume contains important data, please make sure you have properly backed up everything before deleting the partition.
- Open Disk Management. Right-click Computer icon (which is called This PC in Windows 10), and choose “Manage”. Then you can click “Disk Management” on the computer management window.
- Select the partition you want to delete and right click on it to select “Delete Volume”.
- Click “Yes” button when you get the “Delete simple volume” message box saying deleting this will volume will erase all data on it. Backup any data you want to keep before deleting.
When the partition is deleted, you get unallocated space which can be added to other partitions or create a new partition.
Delete volume with free Windows disk manager software
Eassos PartitionGuru Free version – a free disk management program helps you manage hard disks and partitions efficiently. It is able to create, delete, format, resize, clone or backup partitions, recover deleted files, check bad sectors, edit hex data, convert disk format. When the partition is deleted, you can add unallocated space to any partition without losing data. First, let’s see how to delete volume using Windows partition manager.
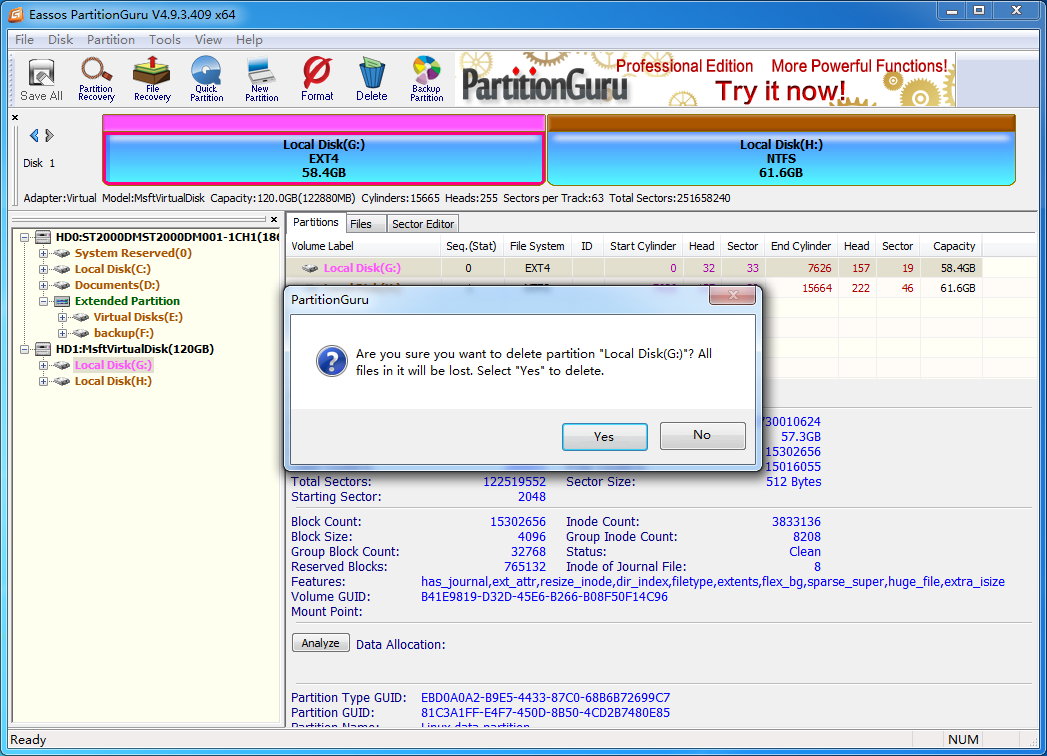
- Install and launch PartitionGuru from your computer which runs Windows system. Then you can see all disks and partitions on the computer including the volume you want to delete.
- Select the partition to be deleted, and click “Delete” button.
- PartitionGuru prompts the action will delete the partition and all files in it. Click “Yes” to continue.
- Click “Save All” button to saving changed to partition table and make the action work.
How to restore deleted and lost partitions?
PartitionGuru provides partition recovery feature which searches lost partitions and then recover them by saving them to partition table. Then the deleted partition together with files will be recovered and then accessible in Windows explorer.
Once a partition is deleted, you’ll get free disk space on the disk. If you want to recover the deleted partition, you should not do any action that space. Deleted or lost partition can be restored by following methods:
Step 1: Run PartitionGuru and you can see the free / unallocated disk space. Select the free space and click Partition Recovery button.
Note: If your partition got lost due to repartitioning hard drive, you should select the entire disk from the directory partition and then click Partition Recovery button.
Step 2: Click Start button on the Search for Lost Partition window. Then PartitionGuru starts to search for lost partitions on the selected space.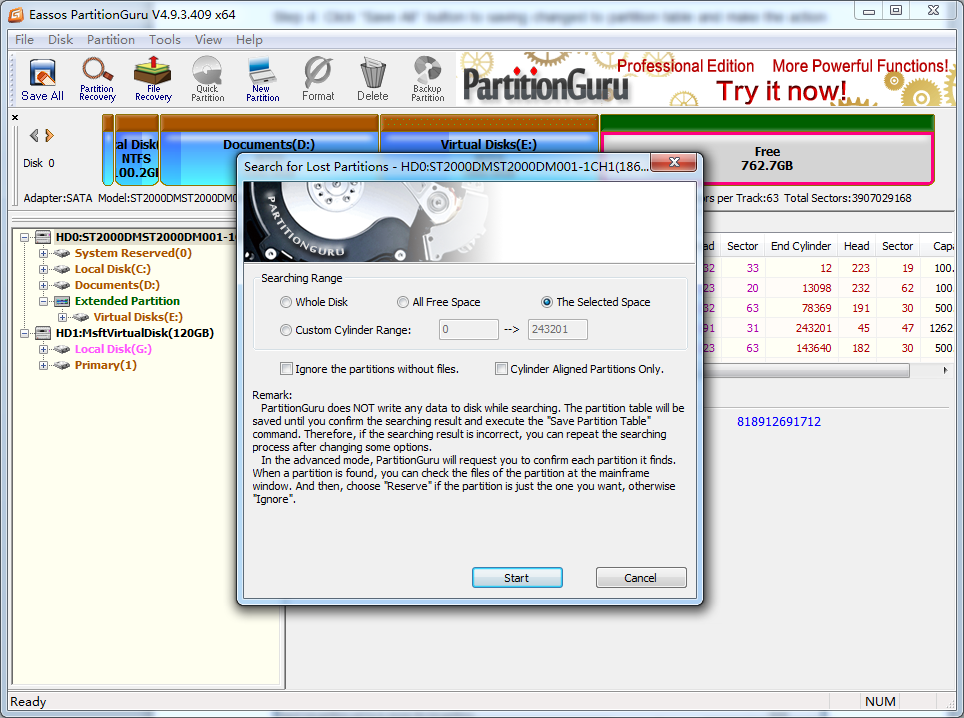
Step 3: Reserve or Ignore partition. Once PartitionGuru finds out a partition, it asks to reserve or ignore it. How to make the decision? You can preview files in the partition, then you can decide whether it is the one you want to recover. If the partition is correct, then click Reserve, or select Ignore.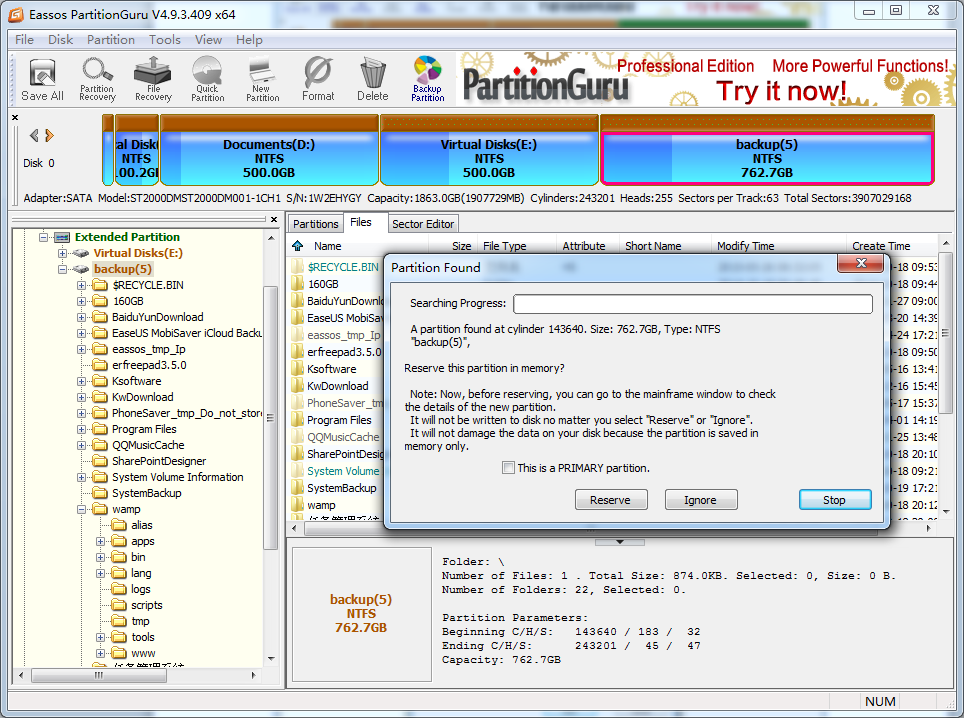
Step 4: When PartitionGuru finds out all recoverable partition, you’ll get following message box. Click “OK”.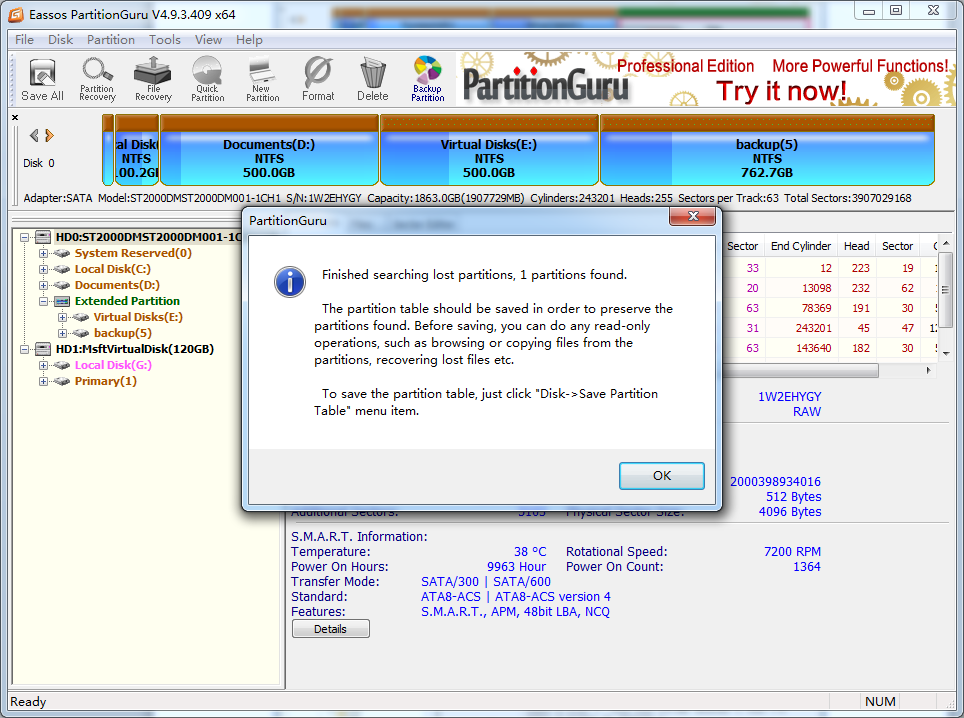
Step 5: Now you can save the lost partition to partition table to get it recovered. Also, you can copy files in this partition to another partition. To save partition table, please click menu Disk and choose “Save Partition Table”.
Conclusion
In this tutorial we explained why and how to delete partition using diskpart command step by step. Besides, we also show you how to delete partition via Disk Management as well as free Windows partition manager software. You can use any of these methods to delete a partition when necessary. One thing should keep in mind is that deleting partition causes data loss, please backup important data before deleting any partition or data.