In this post you will learn how to use VMDK recovery tool to recover lost or deleted files & partition from VMDK virtual disk with the help of DiskGenius. DiskGenius is able to load virtual disk and perform virtual disk data recovery without launch the virtual machine. Let’s see how this works.
Overview on VMWare data recovery
VMWare is one of the most widely used virtual machine software. It is able to run on multiple operating system platforms such as Windows, Linux, MacOS. The application VMWare workstation can be used to install and run various copies and editions of same operating systems on a single physical machine.
Users can benefit a lot by using virtual machine software, for instance, you may want to try a new operating system without reinstalling current system, run old application which is not compatible with current OS, test suspicious files for malware, test or develop software for other platforms. In a word, it is very likely that virtual disk which is the storage device of virtual machine contain large amount of important data.
VMWare data recovery scenarios you may encounter:
Recover deleted files from VMDK: accidental deletion cannot be avoided when you work on a virtual machine.
Recover data from RAW / formatted drive of VMDK: Likewise physical hard drive, partitions on VMDK can also turn to RAW gets formatted.
Recover lost partition from VMDK: you may delete partition by mistake.
VMDK recovery tool
DiskGenius is advanced data recovery, partition manager and data backup software for hard drive, virtual disk, USB flash drive, SSD, memory card, etc. It is recommended to use DiskGenius as your VMDK recovery too to get back lost data from VMDK file, for this software can load and open virtual disk without launching the virtual machine software. In this way, you can perform VMWare data recovery without running operating system on the workstation, thus the recovery process can be totally read-only. Main features of VMDK recovery tool – DiskGenius:
- File recovery: recover lost or deleted files from Recycle Bin, USB drive, hard disk, virtual disk, etc.
- Partition recovery: Restore lost partitions as well as retrieve data from RAW drive.
- RAID array corruption: Construct virtual RAID
- Edit hex data: analyze hex data to perform manual recovery
- Deep scanning: recover files by file type when directory gets damaged
- Supports file systems of all popular OS, such as: FAT, FAT16, FAT32, FAT64, exFAT, NTFS, EXT2, EXT3, EXT4.
- Supports multiple virtual disk formats: VMDK. VHD, VDI
How to open / load VMDK without running virtual machine?
With DiskGenius you can open VMDK virtual disk files and load files on the disk, after which you can manage the disk just like a regular disk. Since VMDK is not supported by Windows, partitions on the disk cannot be assigned drive letter, but you can fully access the disk in DiskGenius. Let’s see how to open a VMDK virtual disk file:
Step 1: Install and launch DiskGenius from the physical computer where the VMDK file is located.
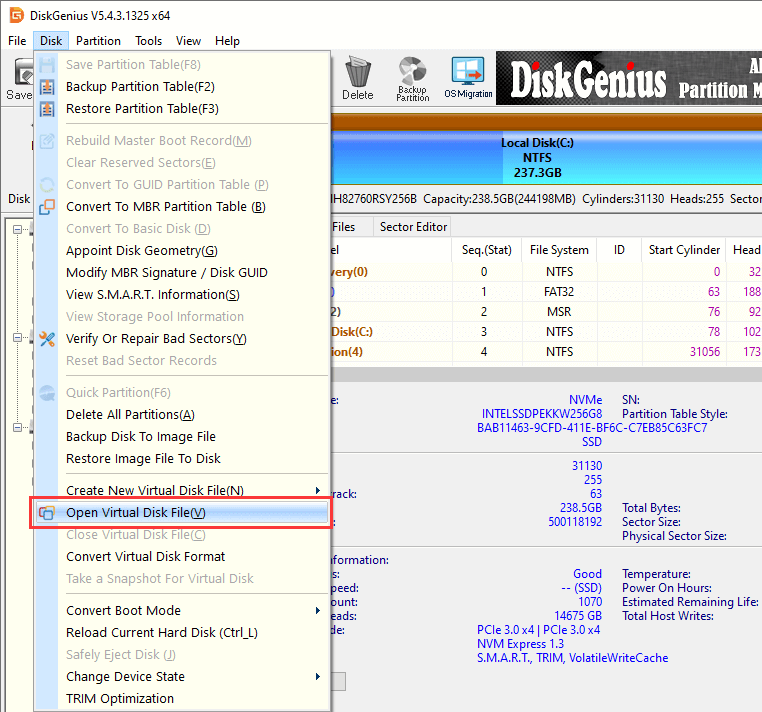
Step 2: Click “Disk” menu and select “Open Virtual Disk File“, as below:
Step 3: Select the virtual disk or disk image you want to open and load it. Then you can view the disk in DiskGenius.
Recover lost data from VMDK using VMDK recovery tool
Although you can run DiskGenius in virtual machine, it is not recommended to recover lost data directly in the workstation. That’s because there might be writing operations to the disk when operating system is running. Thus, loading virtual disk in DiskGenius and recover data on the physical machine is the better choice.
Step 1: Run DiskGenius from physical machine and load the VMDK disk where you want to recover data.
Step 2: Select the partition where lost files were stored and click “File Recovery” button from toolbar.

Note: if you want to recover lost partitions, then select the disk and click Partition Recovery button.
Step 3: Select recovery mode and click Start button. If you are not sure which recovery mode to choose, you can just follow the default setting.
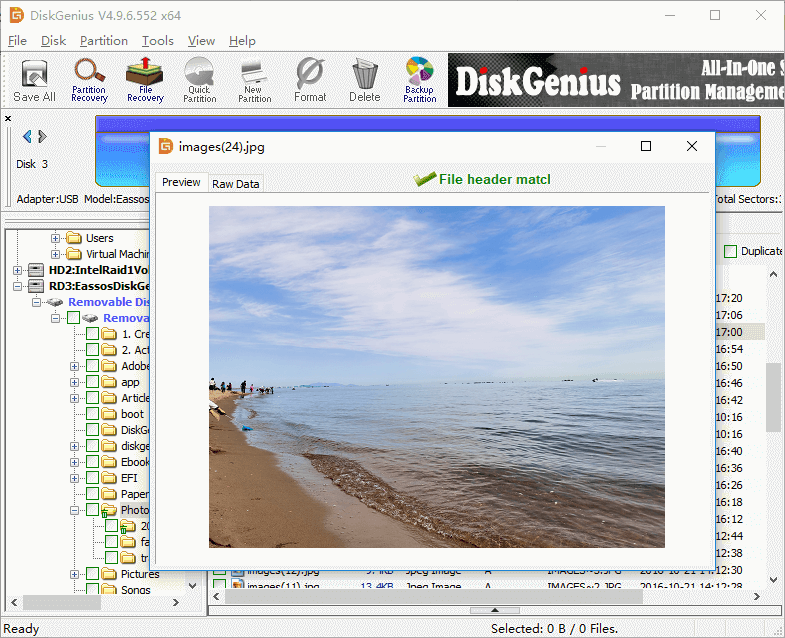
Step 4: Preview and recover data. Preview recoverable files in scanning result to check if your files are found. Then save files you need to a different location.