This article introduces a step-by-step method to image a hard drive using Free disk imaging software DiskGenius Free Edition. Creating hard drive image is an effective solution to protect, backup files, migrate OS, recover data from damaged disk, etc. If you want to backup a hard drive or USB drive into an image file, continue reading.
What is a disk image?
A disk image is a compressed file that contains the exact copy of a hard drive, including partitions, all data of operating system, boot information, partition table, installed applications, individual data, etc. The disk image file can be restored on various devices such as the original disk, HDD, SSD and removable disks. Moreover, the image file can be stored on anywhere that you can access.
Image hard drive VS. clone hard drive, what’s the difference?
Both imaging hard drive and cloning hard drive create an exact copy of hard drive, helping you back up files. Have you ever wondering what’s the difference between them and when we need to image a hard drive instead of cloning hard drive? Now let’s take a closer look at the difference together.
What are the merits of each approach? Say you want to replace current hard drive with a new SSD, you can clone system hard drive or migrate Windows, after which replace the old disk. Another situation is that you want to create a back for the entire hard drive instead of certain partition, so that you can restore data once the old hard drive is corrupted, or some files get lost.
The advantage of imaging a hard drive lies in versatility. Since the disk image file is singe file which seems like a compressed file, you can store multiple images on a disk as long as the disk is large enough. Therefore, you can keep backups for several hard drives at the same time, easier and much economical than clone disk. One thing you should note is that disk cloning process will remove and overwrite existing data of the destination disk, and yet disk imaging does not disturb existing data.
When do you want to image a hard drive?
As has mentioned above, disk imaging process backs up the complete content, including files, partitions, partition table, master boot records, etc. of original hard drive into a compressed image file. The image file can be restored onto either original disk or other storage devices. Here are a couple of scenarios that you may need to create a disk image.
- Back up data: when it comes to backup, imaging disk makes more sense, as it is able to create multiple backups when you want to. In this case, you can keep several backups created for different hard drive status. What’s more, if you keep these disk backups on several different locations, you will have a good ability to resist risks of data loss, for example, virus, system crash, disk failure.
- Recover data from damaged hard drive. In many case, hard drive is damaged to badly that data recovery software cannot scan the hard drive to look for lost data. We can image the hard drive then recover data from disk image without scanning the damaged disk. DiskGenius supports to skip bad sectors when imaging damaged hard drive.
- System utilities: Disk imaging is also used in system migration. SSDs are popular these days, and users prefer to install Windows OS and some third-party applications on SSD, in order to get better performance. Apart from migrating Windows OS, you can also try image disk.
Free disk imaging software is available
The initial steps of imaging a hard drive is to choose a proper disk image software. Here I recommend DiskGenius Free Edition.
DiskGenius is free disk partition manager software, and it provides overall features regarding managing disks and partitions, for example, migrating Windows OS, clone disk, resize partition, format partition to EXT4/FAT32/exFAT/NTFS, backup a partition or hard drive into an image file, create bootable USB drive, completely wipe a hard drive, permanently delete files, extend partition, etc. In addition to disk partition management, DiskGenius also provides functions on data recovery, for example, recover deleted files, recover lost partitions, recover data from RAW or formatted drives, etc. More features:
- Easy to use: the first impression given by the main interface is that the software is complicated. However, in face, each function requires very simple steps. Even though you are new to disk imaging or data recovery, you will not find it difficult to work with the software.
- Various storage devices are supported: internal hard drive, external hard drive, USB flash drive, memory card, virtual disk (.vmdk, .vdi, .vhd, .vhdx, .hdd, .qcow), RAID, dynamic disk, Windows Storage Spaces, etc.
- Supported OS: it is compatible with all versions of Windows operating system, for example, Windows 11/0/8.1/8/7/Vista/XP, Windows Serveir 2022/2019/2016/2012/2013/2008.
- Supported file system: this application has full access to FAT12, FAT16, FAT32, exFAT, NTFS, EXT2, EXT3 and EXT4 drives.
Guide #1: Backup hard drive into an image file
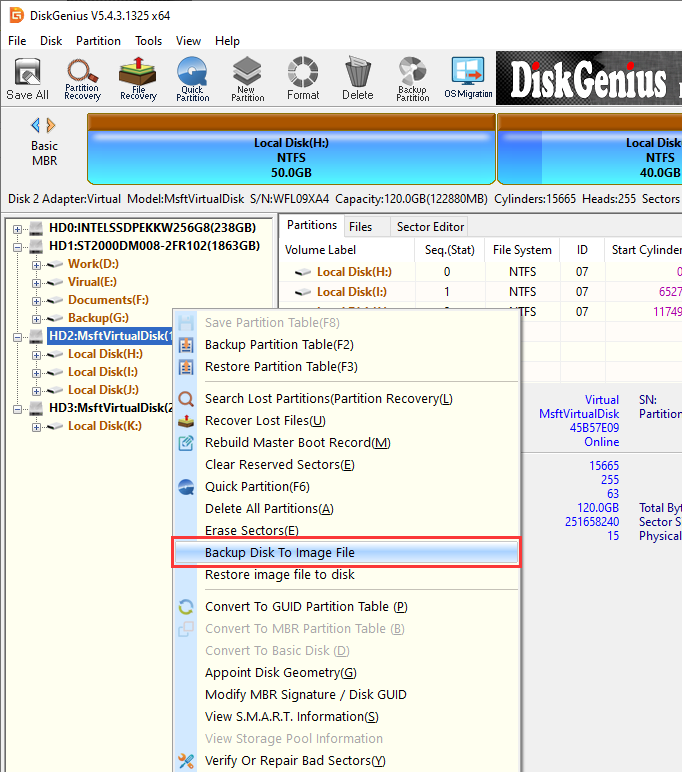
Step 1. Launch DiskGenius Free Edition, location the hard drive you want to image in the software. Right-click the hard drive and choose “Backup Disk To Image File” option.
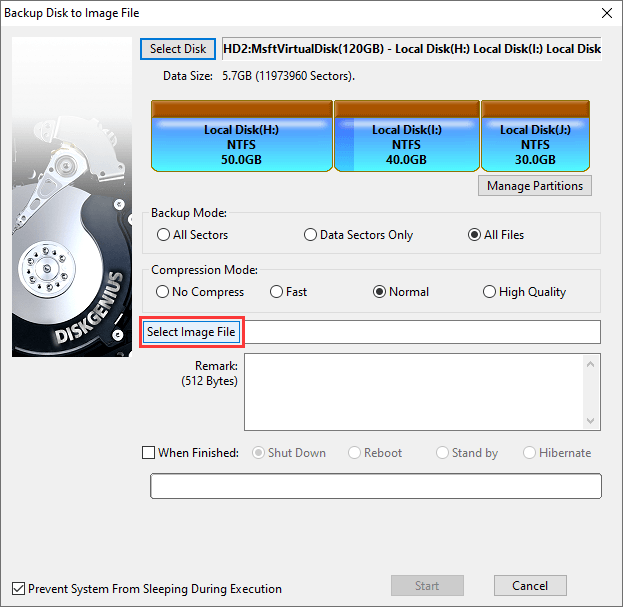
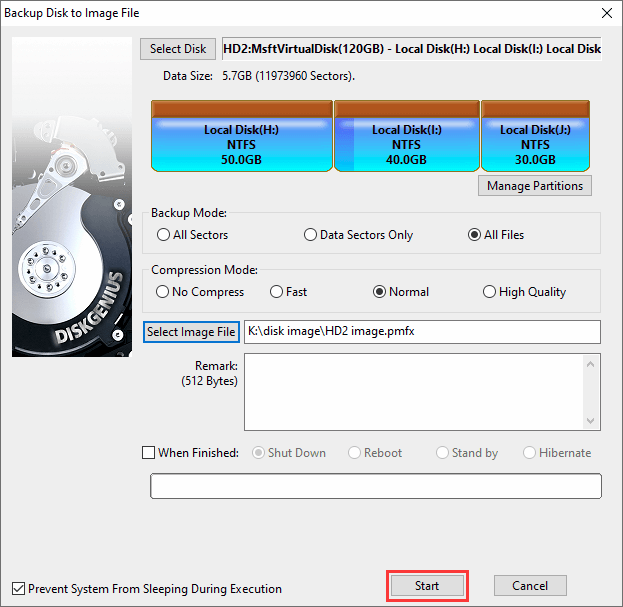
Step 2. Set a location and name for the disk image file.
Click “Select Image File” button on the pop-up window.
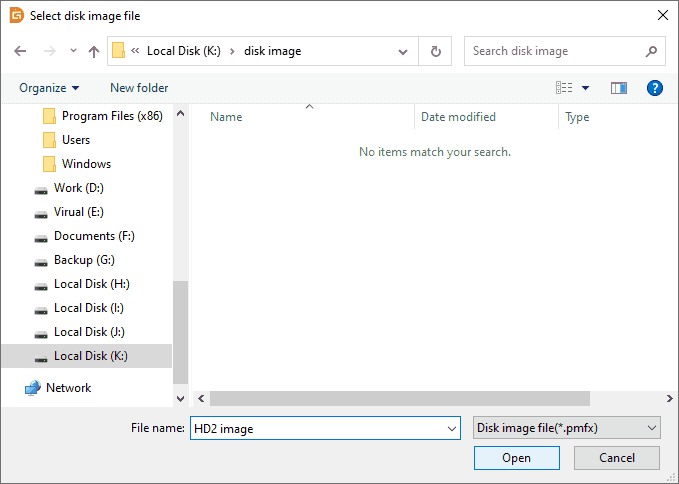
Set a location to store the image file and enter a name. Then click “Open” button.
Step 3. Select a backup mode and click “Start” button.
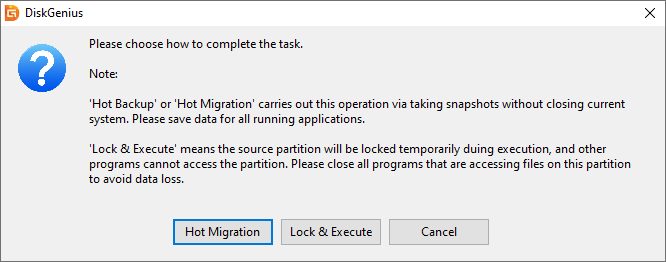
Step 4. Choose how to perform the disk imaging task.
Step 5. Wait for the process to finish.

Steps to restore image files to hard drive
The image file can be restored onto any hard drive which is large enough to receive all data in the image file. Here is how to restore the disk image:
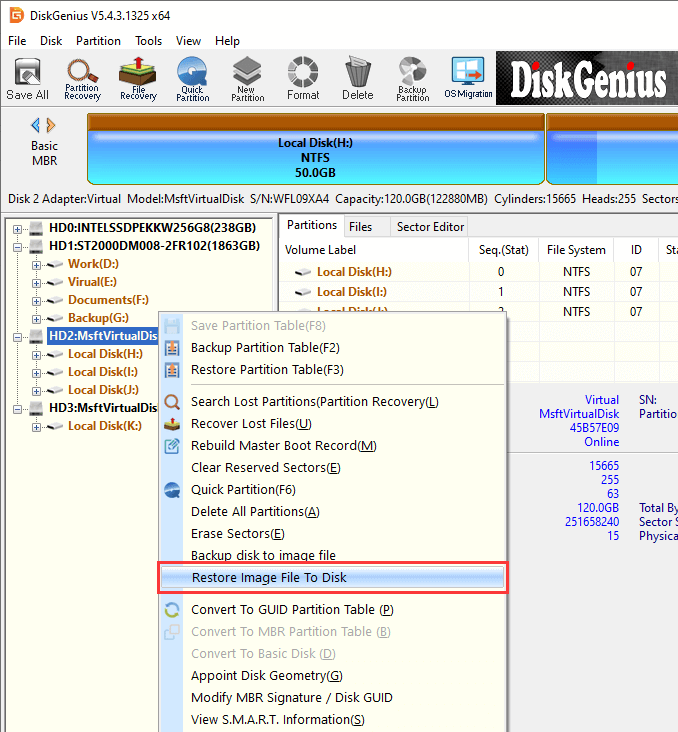
Step 1. Launch DiskGenius Free Edition. Right-click the destination hard drive and choose “Restore Image File To Disk” option.
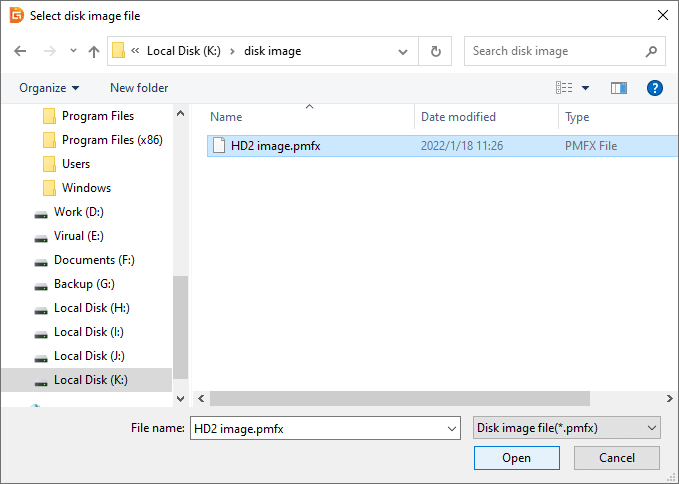
Step 2. Select the image file and click “Open”.
Step 3. Click “Start” button.
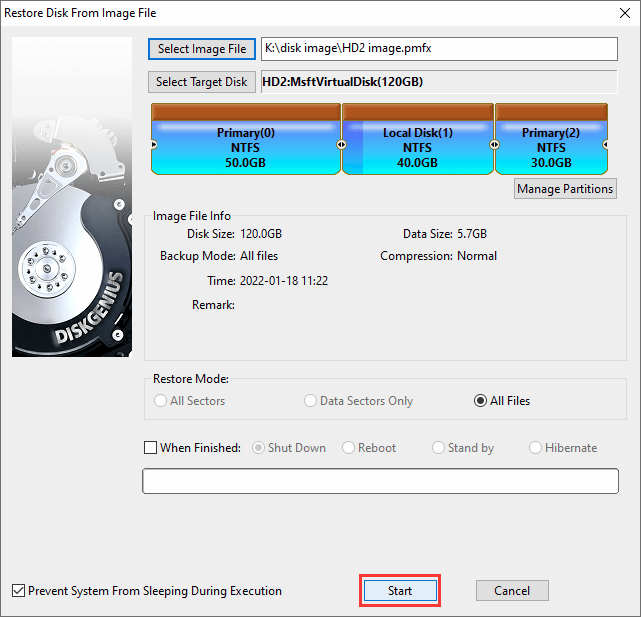
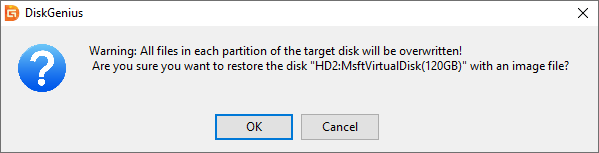
Note: All data on the destination disk will be lost and overwritten. Be sure you’ve backed up important files on the destination disk before clicking “OK” button.
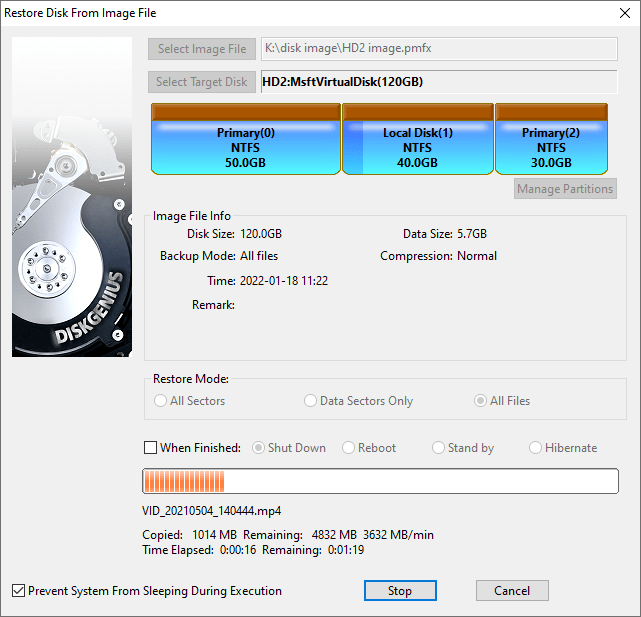
Step 4. Wait for the process to complete.
Guide #2: Image a hard drive with bad sectors into an image file
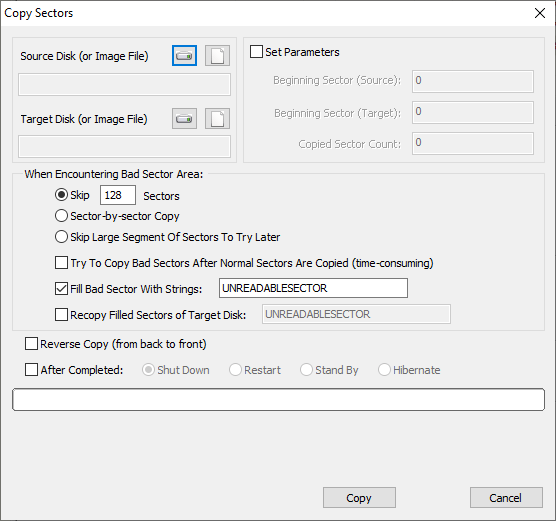
Note: this guide will use “Copy Sectors” to image a disk. With this function, you can set whether to skip bad sectors and how to deal with bad sectors. This function is available for the Standard Edition and Professional Edition.
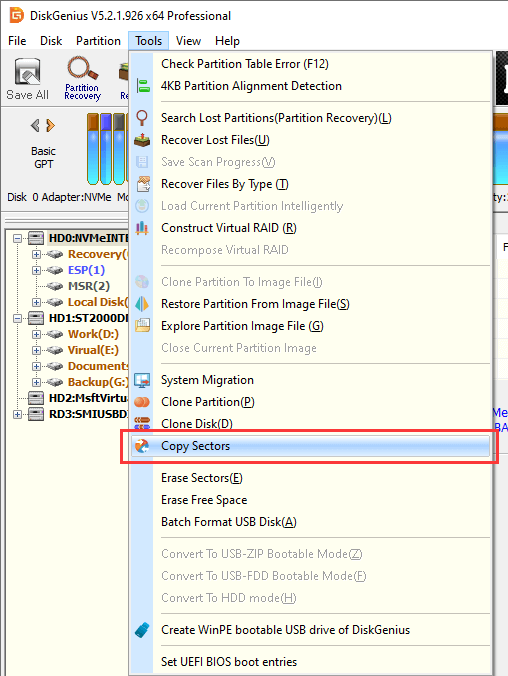
Step 1. Launch DiskGenius and register it to a proper edition. Click “Tools” menu and select “Copy Sectors” option.
Step 2. Select source disk and set location for the image file.
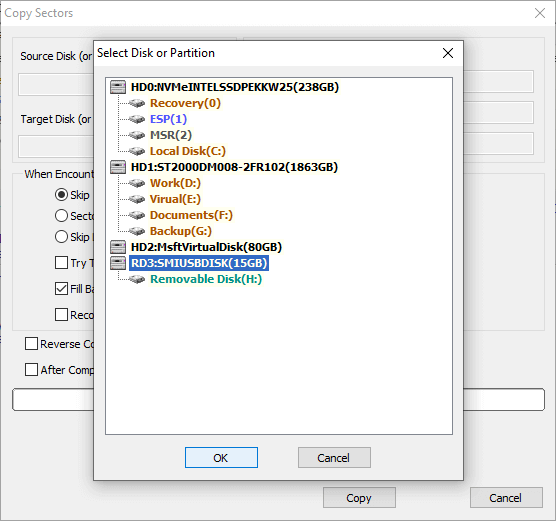
Click the disk icon next to “Source Disk (or Image File)” on the pop up window.
Select the damaged disk you want to image and click “OK”.
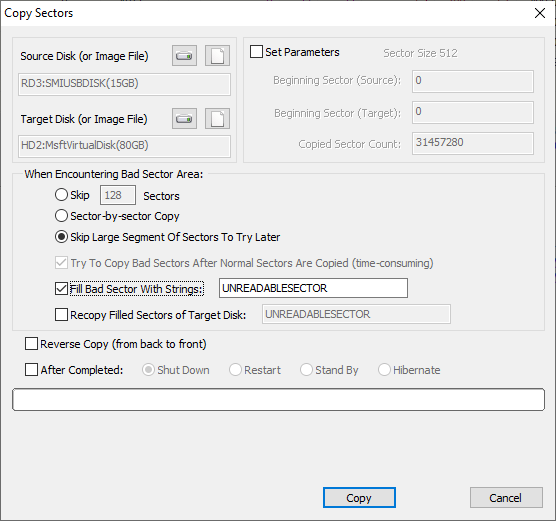
Click the file icon next to “Target Disk (or Image File) ” to set a location and name for the image file.
Step 3. Preset how to deal with bad sectors and click “Copy” button.
Note:
- The disk imaging process may take long time if the disk being imaged has very large capacity or contains bad sectors.
- If the disk contains bad sectors, you can select option like “Skip 128 sectors”, “Skip large segment of sectors to try later”, etc. based on the actual condition of the hard drive.
- If you just want to image a segment of sectors of source hard drive, you can select “Set Parameters” option, and then specify the scope.
Step 4. Click “Complete” when the imaging process finishes. Then you can open target disk to view the disk image.
How to restore the image to another healthy disk?
If you want to restore the disk image to hard drive, you can refer to these steps. Please note that the target disk which the disk image will be restored to should be big enough to hold everything in the image; besides, files on target disk should be backed up in advance, as the process deletes files on target files while restoring disk image.
Step 1: Launch DiskGenius Pro and select “Copy Sectors” under Tools menu.
Step 2: Select disk image. Click “Select Source File” next to “Source disk (or Image File)”. Then locate the disk image and click Open.
Step 3: Select target disk. Click “Select Target Disk” next to “Target Disk (or Image File)”. Then select a disk and click OK. Make sure you choose correct disk.
Step 4: Click “Copy” button and the disk image software starts restoring disk image to target disk.
Step 5: Click “Complete” when the process finishes.
Once the disk image is restored, you can access files in it or perform hard disk recovery with free data recovery software.