This post focuses on solutions to “There is no disk in the drive. Please insert a disk into drive” which may pop up when you start computer or use an add-on program which works with QuickBooks. If you are experiencing this error and looking for resolutions, you are at the right place. You can find multiple solutions here to help you fix this issue step by step.
Overview on “There is no disk in the drive” issue
In fact, the error “There is no disk in the drive. Please insert a disk into drive” appears in many situations. If you search this error message on Google, you’ll see a number of search results which may confuse you. It is not limited to QuickBooks installations only, for example, it might have something to do with NVIDIA software, MS office, drivers, mismatched drive letters, etc. When you start computer, the error message may come up:
There is no disk in the drive. Please insert a disk into drive \Device\harddisk\Dr1
Here is a real case happening among all of us:
“When I tried to launch a recently installed application, I was stuck in the loading process and received an error message on a message box names “Drive Not Ready”. The actial information is ‘The drive is not ready for use; its door may be open. Please check drive A; and make sure that a disk is inserted and that the drive door is closed.’ There are three buttons: Cancel, Try Again and Continue.
I clicked “Continue” and receive another error: No Disk. There is no disk in the drive. Please insert disk into drive \Device\harddisk\Dr1. I tried clicking Try Again or Continue for several time, but still got the error. After doing some Google searching, I see some suggestions and none worked. Does anyone have any ideas to get rid of it?”
Why there is no disk in drive?
- In general sense the no disk error is causes by a removable drive which does not have media in the drive. Besides the old Zip drive and similar drives are also like to lead to the issue often. Here lists the most common reasons behind the problem.
- Mismatched drive letter. If there is a floppy disk drive on your computer, this error tends to occur.
- Removable hard disk drivers. There are multiple kinds if interfaces, USB as well as others, which is likely to cause the problem. For instance, Lomega Zip drive might be assigned drive letter C, or there is not a removable disk in the removable disk drive.
- Latest Windows updates haven’t been installed.
- The drive in question has physical issues and it cannot be recognized by computer system.
Resolutions to fix no disk in the drive issue
Solution 1: Insert a removable disk into the removable drive
It’s necessary to keep media in the drive in question, thus you can try inserting a removable disk in the drive and then restart computer. This method is simple but it is practical for some users. Please note that this method works only when you really have a removable disk whose drive letter is set as the one in the error message and the removable disk is not inserted.
Solution 2: Disable the drive in Device Manager
- Press Windows logo key and R key together to open Run dialog box.
- Input msc in the search box and click “OK” button to open Device Manager.
- Expand Disk Drives to find out the removable disk instead of your hard drive.
- Right-click the disk and select Disable.
- Close Device Manager and reboot computer.
Solution 3: Assign a different letter for the drive in question
- Log on computer as Administrator.
- Click Start button, right-click Computer and then select “Manage”.
- Click Disk Management on the popped up window.
- Right click the volume you need to change drive letter, and then click “Change Drive Letter and Paths”.
- Click “Change” button on the “Change Drive Letter and Paths” box. Then the “Change Drive Letter or Path” dialog box comes up.
- Choose a drive letter you want to use and click “OK” button.
Solution 4: Verify health status for the disk
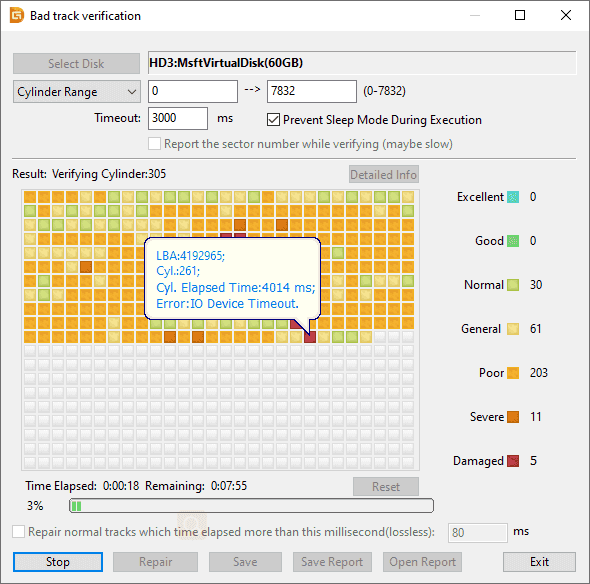
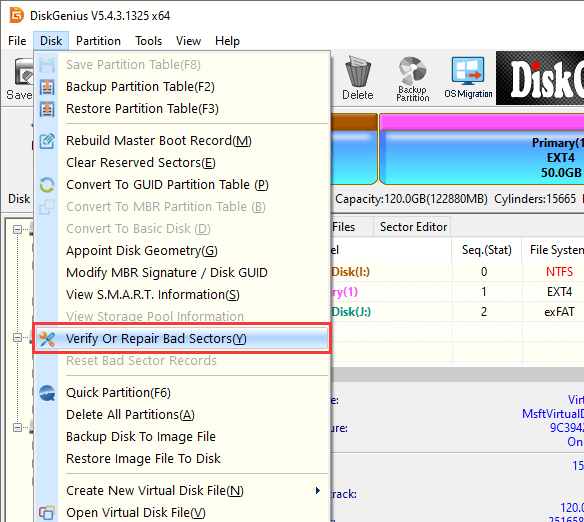
If there is something wrong with the health status of the disk related to this issue, you should take some time to check if the disk is failing. It’s recommended to check bad sectors with DiskGenius (old name PartitionGuru) Free which is a free partition manager and able to check or repair bad sectors for both hard drive and USB disks.
Step 1. Attach the disk that causes “there is disk in drive” issue to computer and launch DiskGenius (old name PartitionGuru) .
Step 2. Click the disk you want to detect bad sectors and select “Verify or Repair Bad Sectors” after clicking “Tools” menu.
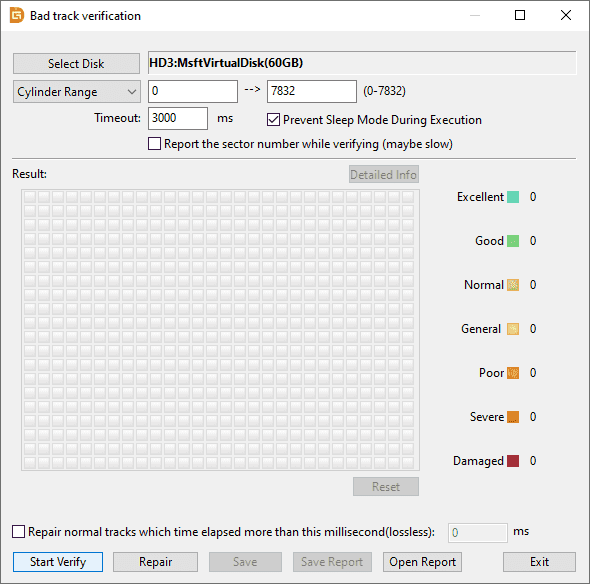
Step 3. Click the button “Start Verify” and DiskGenius (old name PartitionGuru) starts to verify bad sectors for selected disk space.
While verifying bad sectors, DiskGenius (old name PartitionGuru) displays detailed information of hard drive sectors.